Hi everyone!
Over the past few weeks, as we worked on Fiber’s developer experience, we noticed a recurring gap. The documentation explains the individual concepts and APIs, but turning them into a working application still means setting up an environment, connecting the pieces, and navigating several asynchronous states.
We wanted to make that first experience more direct—and try something a little more interesting than another step-by-step guide.
Thanks to fiber-js, a Fiber WASM Node can now run directly in the browser. That gave us the opportunity to put the explanation, real project code, and a live Testnet environment together in one place.
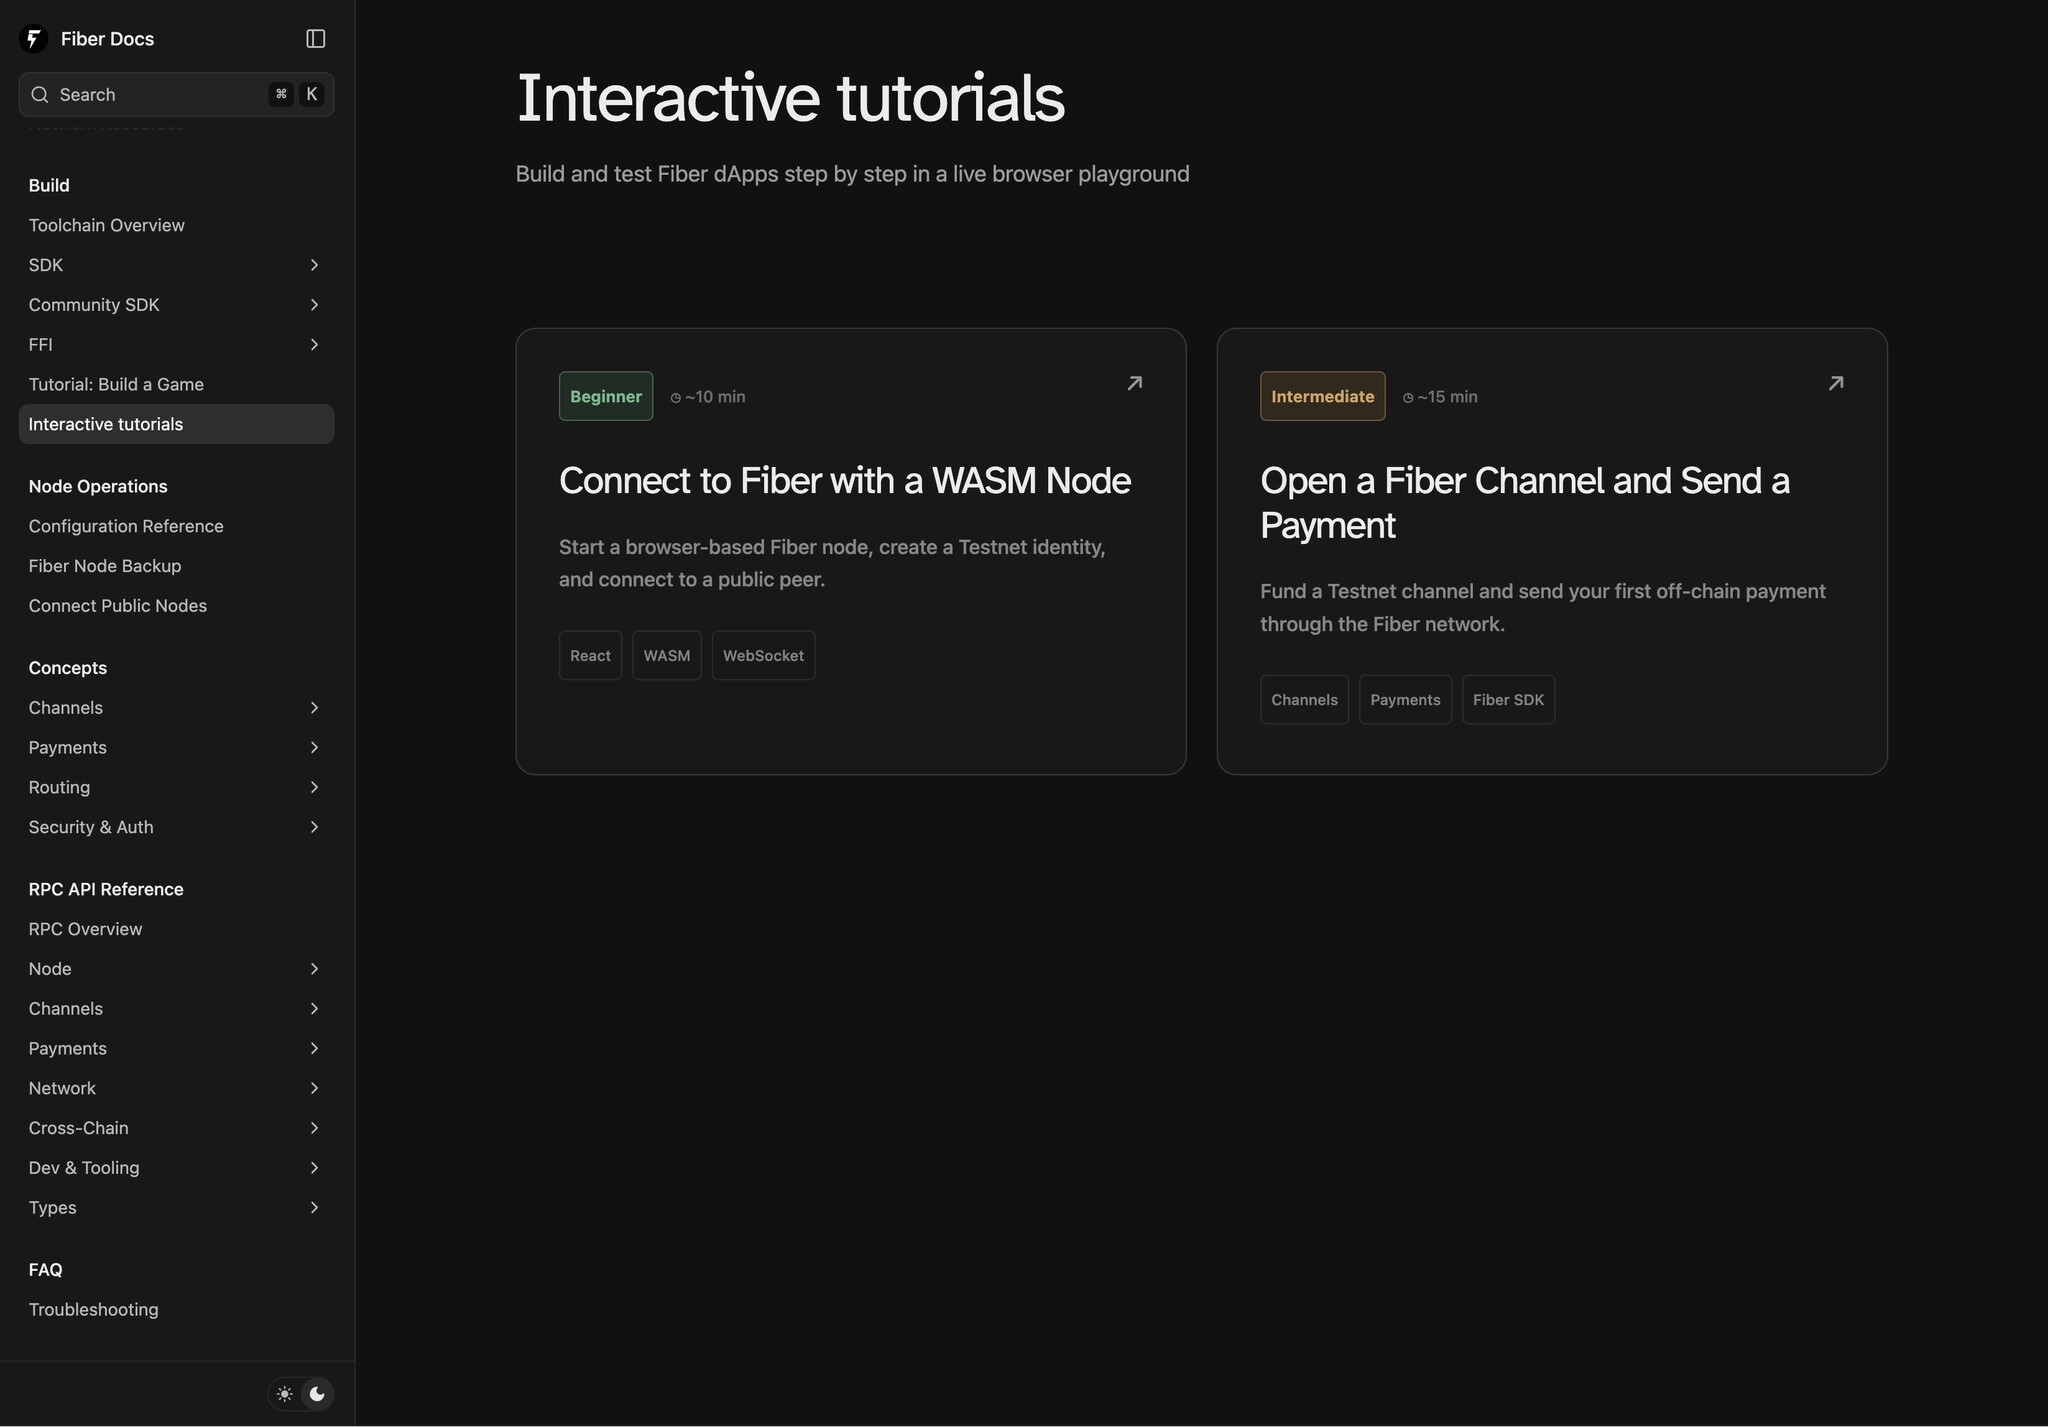
The result is two new Interactive Tutorials where you can start a node, connect to a peer, open a channel, and send an off-chain payment—all from your browser.
Try them here:
Related code:
What Are the Interactive Tutorials?
In one sentence:
They are interactive tutorials that let you read the explanation, inspect the project code, and connect to Fiber Testnet at the same time.
The section currently contains two tutorials:
-
Connect to Fiber with a WASM Node
Start a real Fiber WASM Node inside a React page, create a Testnet identity, and connect to a target Fiber Testnet peer over WSS.
-
Open a Fiber Channel and Send a Payment
Fund the browser node with Testnet CKB, open a real payment channel, observe the complete channel lifecycle, and send the first off-chain payment.
The first tutorial takes approximately 10 minutes, and the second takes approximately 15 minutes.
These are not simulated animations. Starting the node, connecting to the peer, querying the balance, opening the channel, and sending the payment all happen on Fiber Testnet.
More Than “Documentation on the Left, Code on the Right”
For the interaction model, we took inspiration from Stripe’s Checkout Quickstart: the explanation appears on the left, while the corresponding code remains visible on the right.
Fiber workflows involve more asynchronous state than a typical API call, so we extended this model to better fit the protocol.
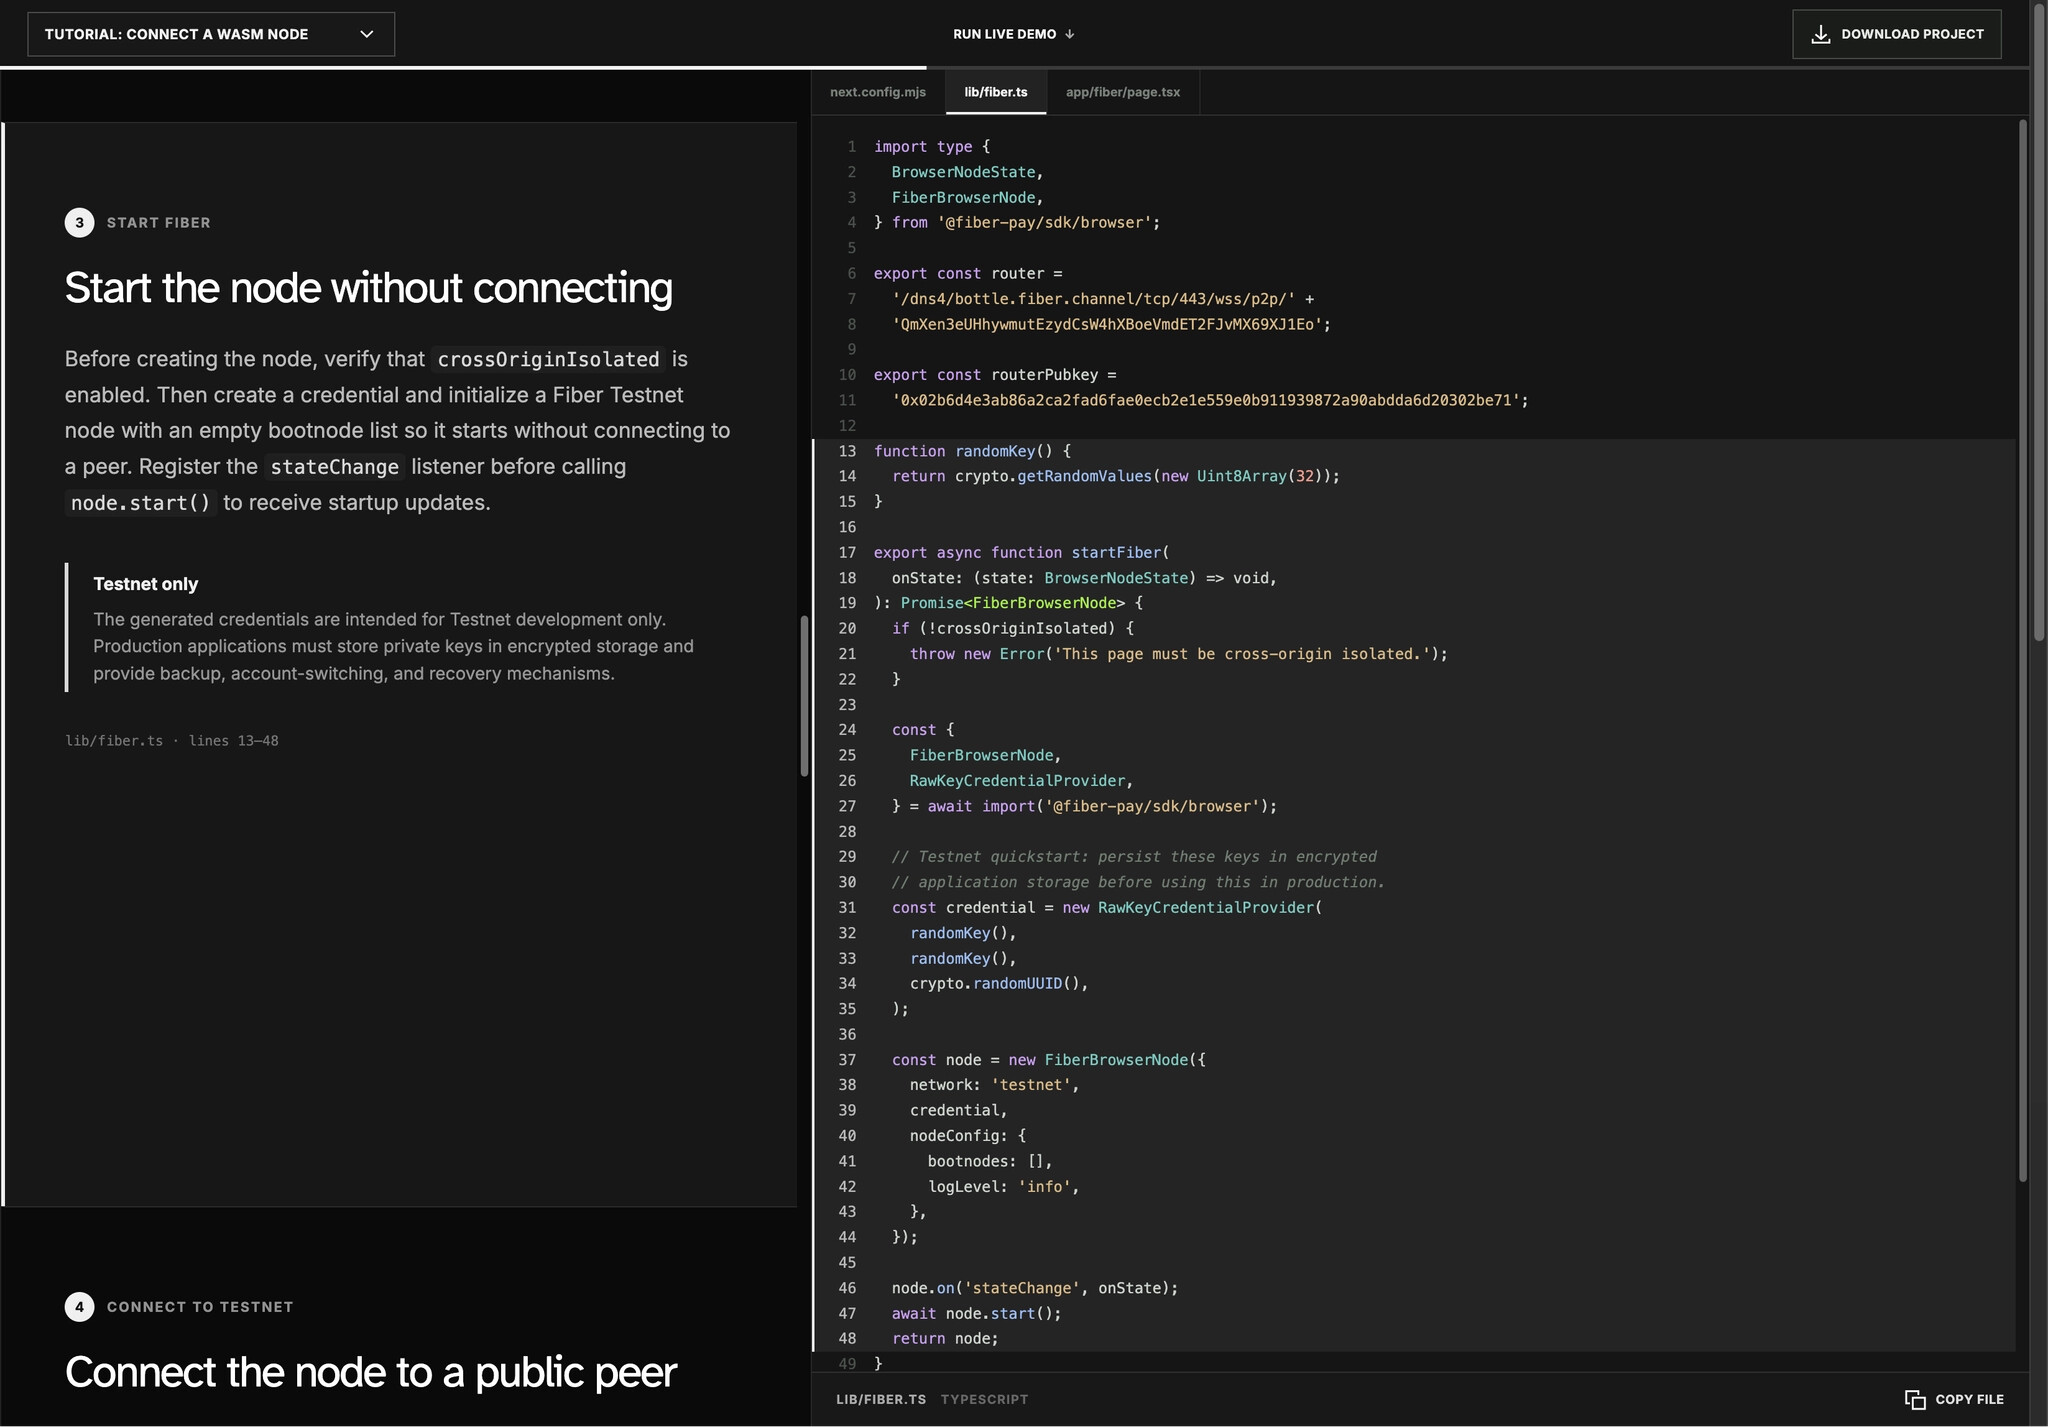
The page is divided into two main areas.
The Tutorial Workspace
The article steps appear on the left, while the real project files appear on the right.
As you scroll through the article, the code panel automatically switches to the relevant file and highlights the lines used by the current step.
For example:
- Configuring cross-origin isolation highlights
next.config.mjs - Creating the node highlights
lib/fiber.ts - Integrating with React highlights
app/fiber/page.tsx - Querying the balance highlights
lib/balance.ts - Converting amounts highlights
lib/amounts.ts - Opening a channel highlights
lib/channel.ts - Sending a payment highlights
lib/payment.ts
Installation and initialization commands remain inside the article. The code panel displays only real project files rather than presenting terminal commands as source files.
Each file can be copied individually, and the complete runnable project can also be downloaded.
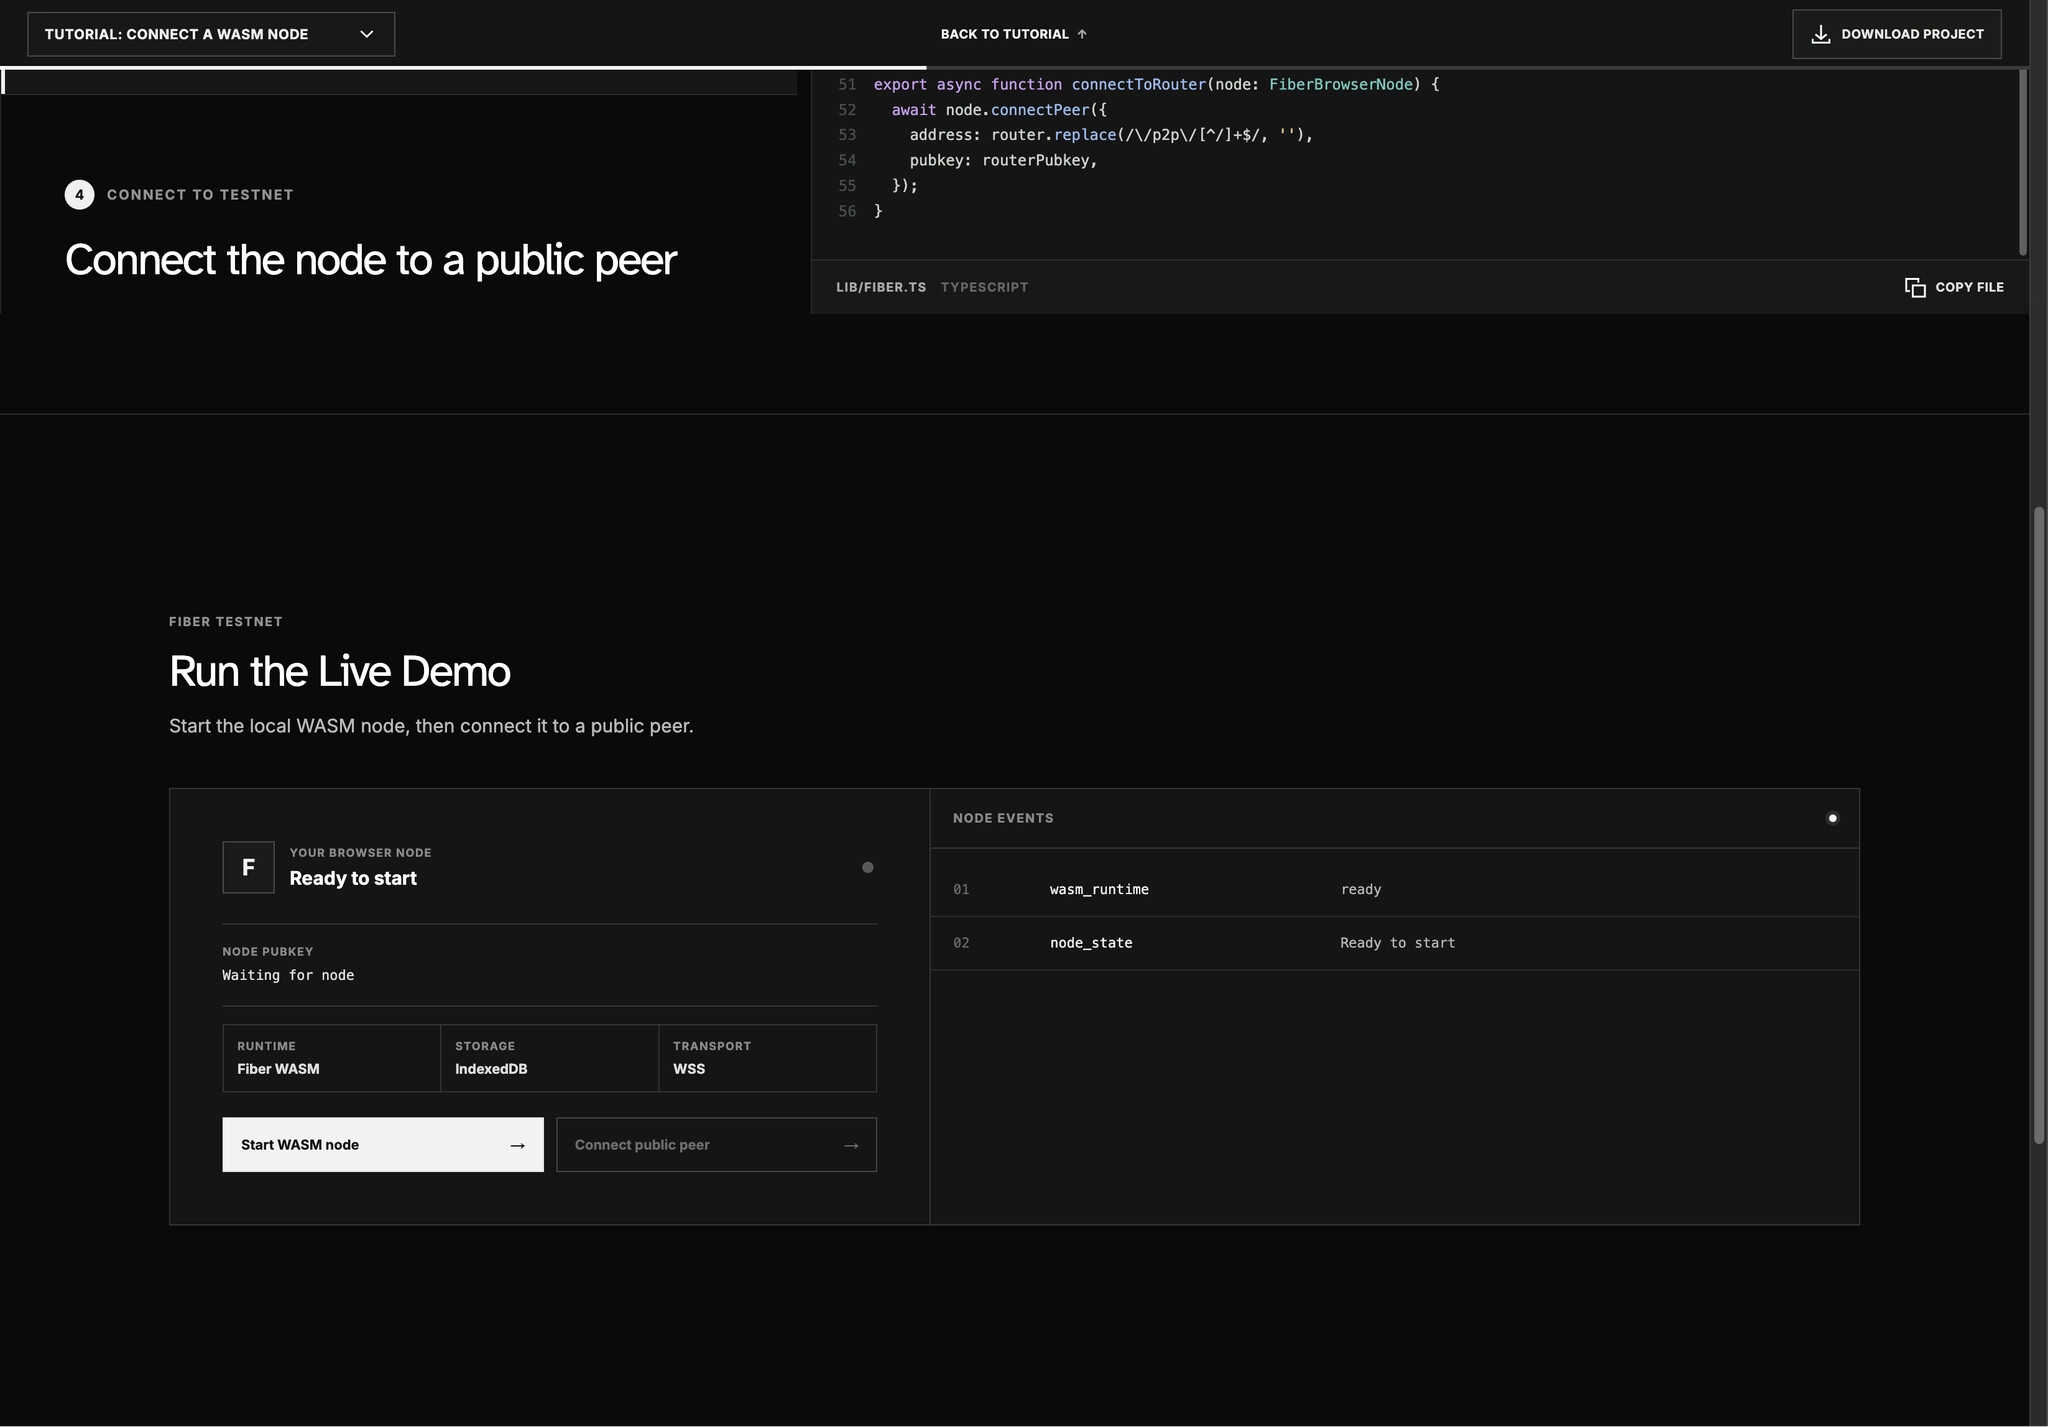
The Live Demo
The tutorial code and the final Live Demo are kept separate.
After reading the tutorial, developers can move to the Live Demo and execute the same operations against Fiber Testnet. Runtime events and results are displayed independently from the teaching workspace.
Buttons are available for navigating in both directions:
Run Live DemoBack to Tutorial
This allows readers to either follow the tutorial step by step or try the Live Demo first and return to the explanation afterward.
Tutorial One: Start and Connect a Fiber WASM Node
One of the easiest aspects of Fiber Browser Node to misunderstand is:
Starting a node and connecting to a remote peer are not the same operation.
We therefore separated them into two explicit buttons.
Start: Run the Local Node
After clicking Start, the browser:
- Loads the Fiber WASM runtime
- Creates or restores the local Testnet identity
- Restores node data from IndexedDB
- Starts the local Fiber Node
At this point, the node has not connected to any remote peer.
This step can be represented as:
Node Runtime
Idle → Starting → Running
The node is now running inside the browser, but it has not yet established communication with the target Fiber peer.
Connect: Establish Communication Without Opening a Channel
After clicking Connect, the browser node establishes a P2P connection to the specified Fiber Testnet peer over WebSocket Secure.
It is important to distinguish this action from channel creation:
Connect only allows two nodes to exchange Fiber protocol messages. It does not create a payment channel, move funds, or lock CKB.
Peer connectivity has its own independent state:
Peer Connection
Offline → Connecting → Connected
After Start, we have a local Fiber Node running in the browser. After Connect, we have a communication session with the target peer.
At this point, only node startup and peer connection have been completed.
The first tutorial ends here. It does not create, query, or display any channel. Channel creation is covered separately in the second tutorial.
The distinction can be summarized as:
Start ≠ Connect
Connect ≠ Open Channel
The Live Demo displays:
- Node Pubkey
- WASM runtime status
- IndexedDB storage status
- WSS transport
- Connected peers
node_startedpeer_connectingpeer_connected
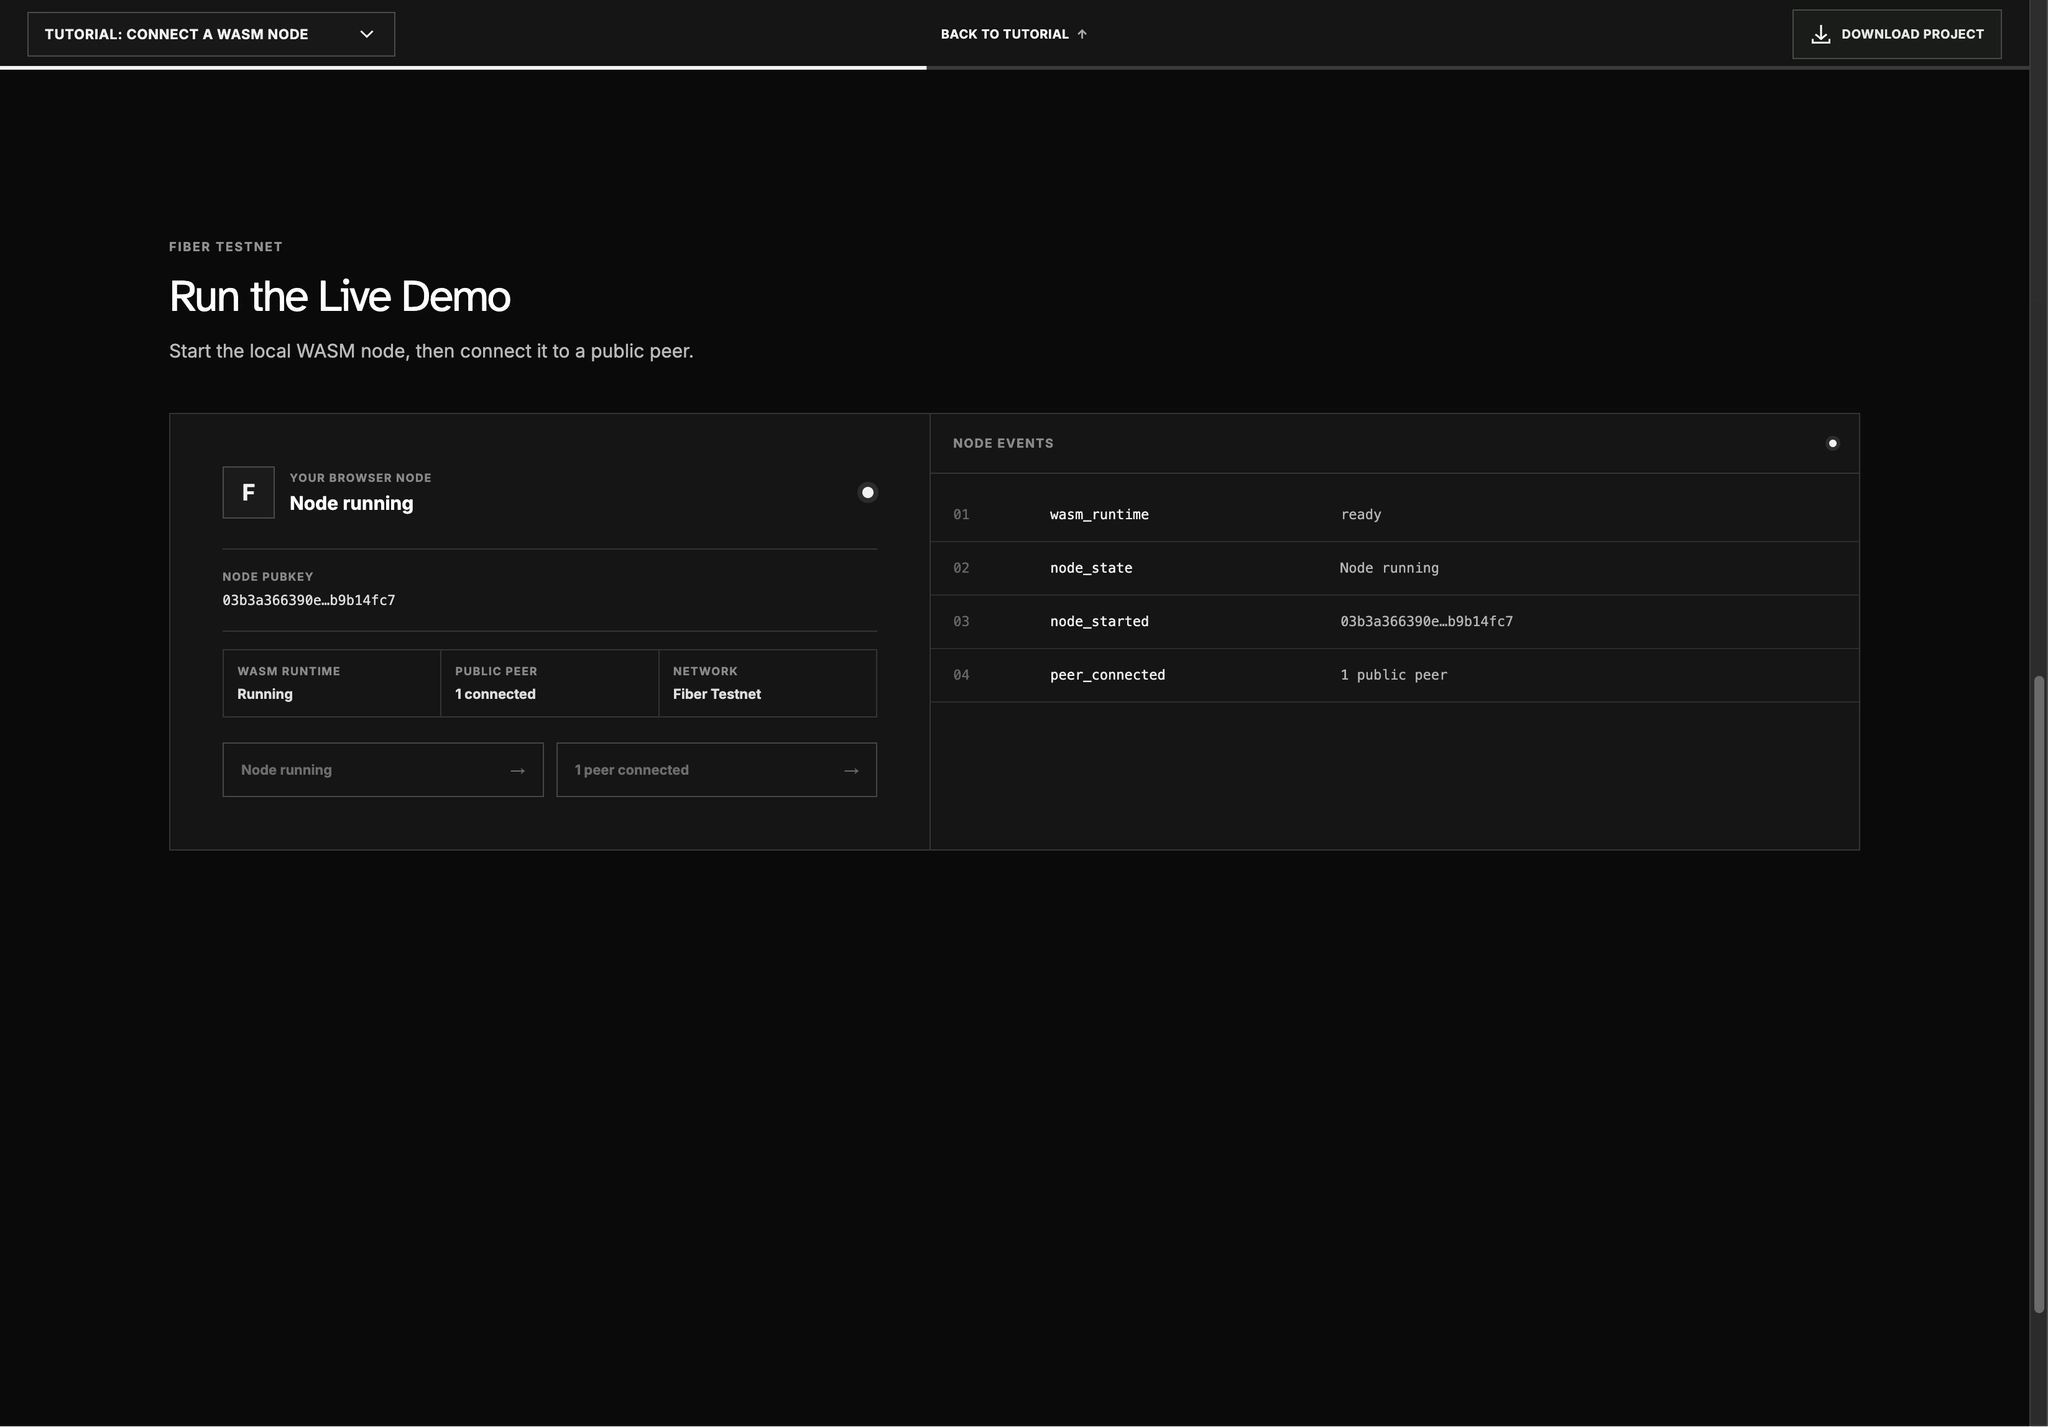
The two nodes can now exchange Fiber protocol messages, but there is still no payment channel between them.
In the second tutorial, we fund the browser node and use this P2P connection to begin channel negotiation.
Why Must We Connect Before Opening a Channel?
This raises an important question:
If opening a channel eventually produces an on-chain funding transaction, why can’t we call openChannel() directly? Why must we connect first?
The reason is:
A Fiber Channel cannot be created unilaterally by one node on-chain.
Before submitting the funding transaction, both channel participants must collaborate:
Establish P2P connection
    ↓
Send Open Channel request
    ↓
Negotiate channel parameters
    ↓
Collaboratively build the Funding Transaction
    ↓
Exchange Commitment signatures
    ↓
Submit and wait for on-chain confirmation
    ↓
ChannelReady
These steps require the two Fiber Nodes to continuously exchange protocol messages.
For example:
- The initiator proposes the channel capacity
- The remote peer accepts or rejects the proposal
- Both participants collaborate on the Funding Transaction
- Both participants exchange Commitment Transaction signatures
- After the Funding Transaction is confirmed, both participants confirm that the channel is ready
Therefore, openChannel() is not a normal on-chain transfer.
It begins as a bilateral negotiation protocol and only later produces an on-chain Funding Transaction.
If the two nodes are not connected:
- The Open Channel request cannot reach the remote peer
- The remote peer cannot accept or reject the channel parameters
- The participants cannot exchange Funding and Commitment signatures
- The channel cannot progress to
ChannelReady
A simple analogy is signing a contract:
Connect is like establishing a call between the two parties. Open Channel is the negotiation, joint signing, and funding that happens during the call. Establishing the call does not lock funds, but without it, the participants cannot negotiate or exchange signatures.
The complete workflow is therefore:
Start Node
    ↓
Connect to Peer
    ↓
Fund Address
    ↓
Open Channel
    ↓
Wait for ChannelReady
    ↓
Send Payment
Tutorial Two: Open a Channel and Send a Payment
Connecting to a peer is only the first step.
The second tutorial continues with a real Fiber Testnet payment flow.
1. Fund the Browser Node
The Fiber SDK derives a CKB funding address from the browser identity.
You can copy this address and request Testnet CKB from the faucet.
This introduces a practical issue:
A successful faucet response does not mean the funds are immediately visible on-chain.
The transaction may take several seconds—or occasionally several minutes—to appear.
The Demo therefore does not query the balance only once. It checks the balance every five seconds and enables the next action only after the funds are visible on-chain.
This is an important part of what we want the Tutorial to demonstrate:
Waiting is not an abnormal UI state. It is part of interacting with a blockchain.
2. Represent CKB Amounts Correctly
Fiber RPC represents amounts as hexadecimal Shannons.
For example:
499 CKB
= 49,900,000,000 Shannons
= 0xb9e0ab300
The Tutorial uses BigInt for amount conversion so that asset values never pass through JavaScript floating-point arithmetic.
This may seem like a small implementation detail, but payment applications cannot rely on ordinary floating-point calculations for monetary values.
3. Open the Payment Channel
Once the node is running, the target peer is connected, and the funding address contains enough Testnet CKB, the application can call openChannel().
The Demo opens a 499 CKB channel by default because the selected Testnet peer automatically accepts CKB channels at or above that amount.
However, another important distinction appears here:
Receiving a Temporary Channel ID from openChannel() does not mean the channel is ready.
It only means that the channel-opening process has started.
4. Wait for ChannelReady
Opening a channel is not an instantaneous operation.
The channel progresses through several states:
NEGOTIATING_FUNDING
        ↓
COLLABORATING_FUNDING_TX
        ↓
SIGNING_COMMITMENT
        ↓
AWAITING_TX_SIGNATURES
        ↓
AWAITING_CHANNEL_READY
        ↓
CHANNEL_READY
These states represent:
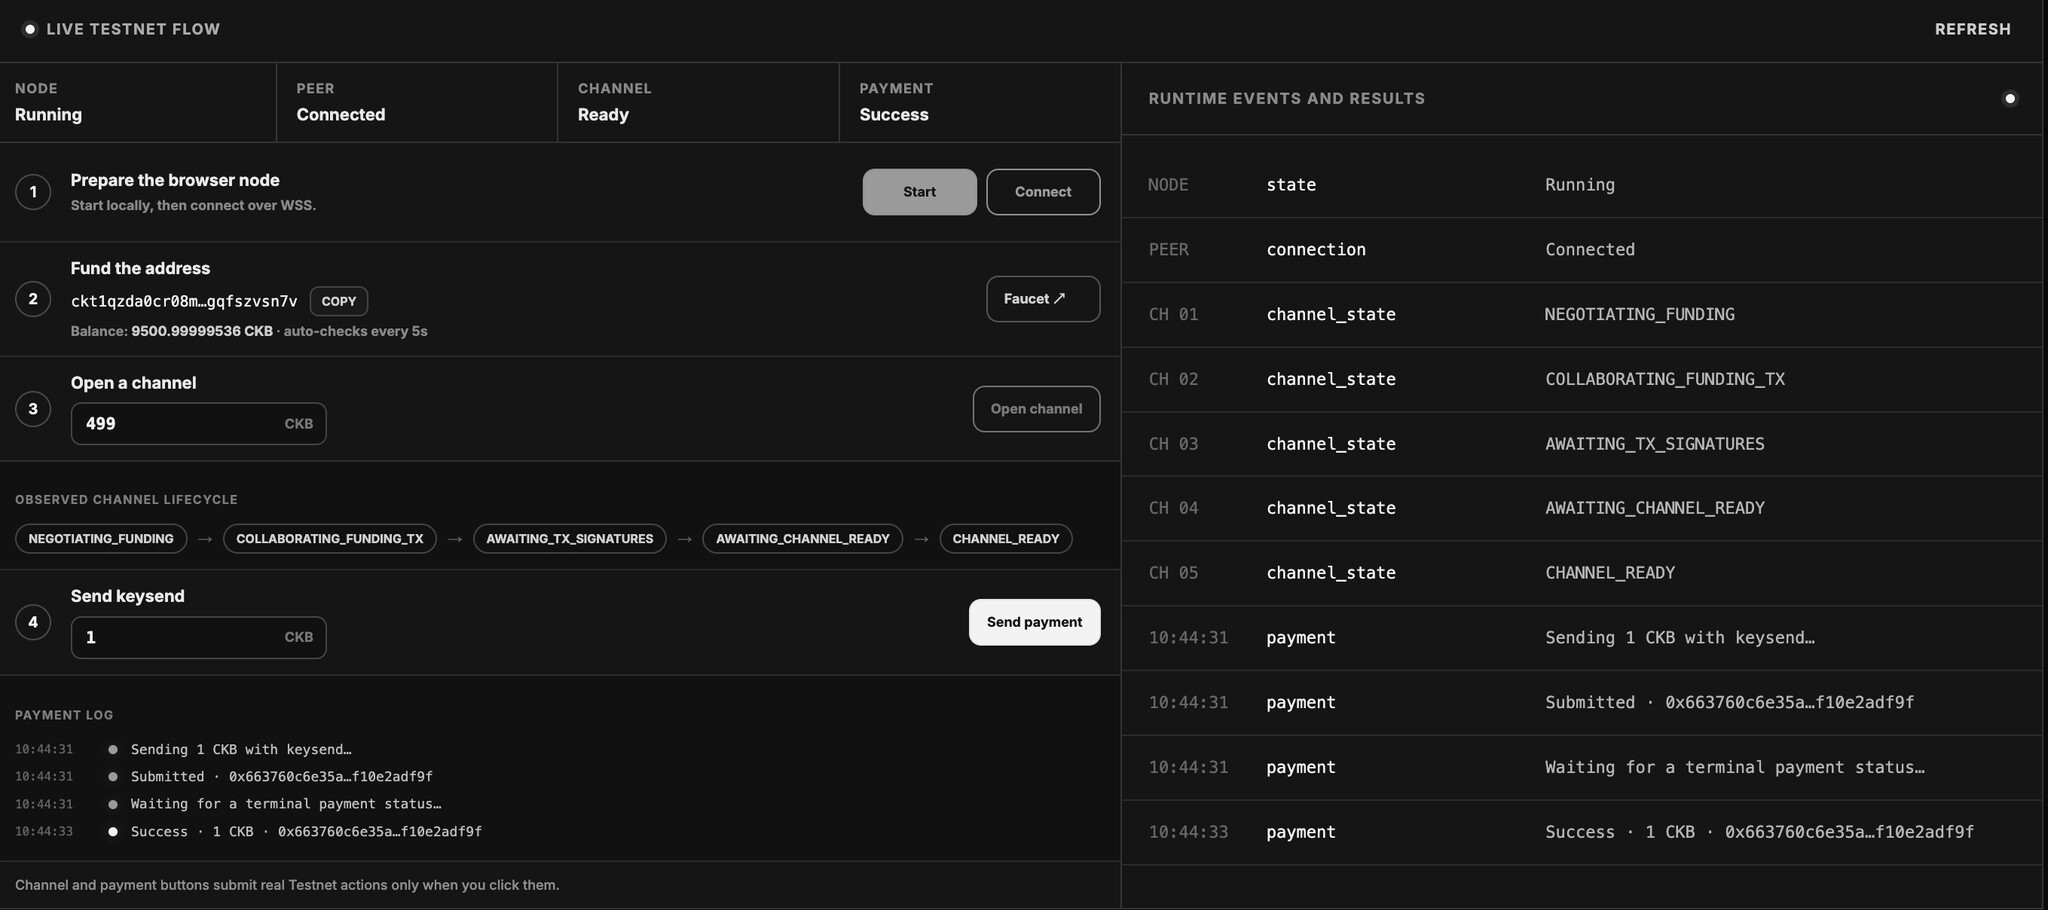
NEGOTIATING_FUNDING: the participants negotiate channel parametersCOLLABORATING_FUNDING_TX: the participants build the Funding TransactionSIGNING_COMMITMENT: the participants exchange Commitment signaturesAWAITING_TX_SIGNATURES: the application waits for Funding Transaction signaturesAWAITING_CHANNEL_READY: the participants wait for on-chain confirmation and readinessCHANNEL_READY: the channel can carry payments
The Tutorial continuously calls listChannels() and displays the channel states it observes.
When another state is expected, an animated arrow indicates that the process has not yet finished.
The payment button becomes available only after the channel has entered CHANNEL_READY.



5. Send the First Off-Chain Payment
To keep the example minimal, the Tutorial uses a Keysend payment.
The browser node supplies:
- The recipient node’s Pubkey
- The payment amount
keysend: true
It then calls sendPayment().
The interface does not display the payment as successful immediately after submission.
“Request submitted” and “payment completed” are two different stages.
If the initial response is not yet Success or Failed, the Demo calls waitForPayment() until the payment reaches a terminal state.
A payment log is displayed below Send Keysend:
Sending 1 CKB with keysend…
Submitted · payment_hash
Waiting for a terminal payment status…
Success · 1 CKB
The Runtime Events panel also records the Channel State and Payment Result.
Why Show All These States?
If the only goal were to create a visually smooth Demo, many of these steps could be hidden.
A user could click a button, wait through a loading animation, and then see a green Success message.
But that would create an incomplete understanding of what happened.
Faucet transactions need time to appear on-chain. Opening a channel requires negotiation, signatures, and on-chain confirmation. A submitted payment may still be in flight.
These are not implementation details that real Fiber applications can ignore.
We therefore made these processes observable:
- Automatic balance polling
- Channel lifecycle polling
- Next-state indicators
- Payment logs
- Runtime events
- Terminal payment results
Our principle is straightforward:
A good Tutorial should not only show developers what success looks like. It should also reveal what happens before success.
Current Limitations
These two Tutorials are still only a starting point.
They currently:
- Connect only to Fiber Testnet
- Use a fixed target Testnet peer
- Use Keysend to keep the payment flow minimal
- Store the Testnet identity locally in the browser
- Do not cover production key encryption and recovery
- Do not cover Invoice payments
- Do not cover channel closing or liquidity management
- Do not handle complete production recovery flows
In particular, the Tutorial’s key-storage approach should not be copied directly into a production application. Production systems must consider encryption, backup, account switching, and recovery.
However, the first Tutorial should not attempt to solve every production concern at once.
Its primary purpose is to help developers complete a real end-to-end flow:
Start a node in the browser
→ Connect to a target peer
→ Open a channel
→ Complete a payment
First make it work. Then understand and improve it step by step.
From Interactive Tutorials to Community SDKs
These tutorials use the community-maintained fiber-pay library, which builds on the official fiber-jsWASM runtime. It packages recurring application work—such as browser-node startup, credentials, common RPC operations, and state waiting—so the tutorials can focus on the complete developer journey.
We have also added a Community SDK section to help developers discover projects such as fiber-pay and fiber-checkout. These projects are independently maintained and should be evaluated for security, compatibility, and production readiness before use.
Building a Fiber SDK or developer tool? Share it with us here or submit it to the fiber-docsrepository.
Final Thoughts
These interactive tutorials are just a starting point. We’d love to hear where you get stuck, what works well, and what you’d like to explore next—whether that’s invoice payments, channel closing, UDT payments, or more complete merchant flows.
Try the tutorials, share your feedback through a GitHub issue or in the community, and help us shape what comes next.
And if you’re building a Fiber SDK or developer tool, we’d love to hear about that too.
Interactive Tutorials:
Related code:
Community SDK: