嗨,大家好!
最近有个想法一直在脑子里转 —— Fiber Network 真的是个很棒的东西,Lightning Network 风格的支付通道,直接在 CKB 上跑,还能支持原生 CKB 和 UDT 代币。但是每次想体验一下,总得折腾半天环境……能不能让这件事变得简单一点?
于是就有了 Fiber Demo Startup 这个项目。
起因:大家都懂的痛点
你们知道那种感觉吗?想了解一个新技术,光是搭环境就得花半天时间。下载这个、编译那个、配置文件改来改去、还需要为账号充值测试代币……等环境终于跑起来了,兴致都消了一半。
所以这个项目的目标很简单:一键启动,开箱即用。
它是什么?
一句话概括:这是一个完整的 Fiber Network 本地开发演示环境,所有东西都给你打包好了。
你只需要两步:
# 第一步:启动基础设施
docker compose up --build
# 第二步:启动演示应用
cd app && pnpm dev
然后打开浏览器访问 http://localhost:3002,就能看到一个交互式的演示界面。

里面有什么?
基础设施层(Docker)
项目会自动帮你启动:
-
CKB 开发链:一个本地测试链,内置矿工,合约都帮你部署好了(FundingLock、CommitmentLock、simple_udt 等等)
-
Bootnode:让其他节点互相发现的引导节点
-
三个 Fiber 节点:每个都有独立的密钥和钱包,可以互相开通道、转账
-
资金分发工具:自动给每个节点转好测试用的 CKB 和 sUDT
总之,该有的都有了,而且都是配置好的。
演示应用
这是我花了不少心思的地方。我做了一个 Next.js 的 Web 应用,有两种模式:
快速入门:三步走,手把手教你
快速入门模式是我专门为新人设计的,把 Fiber Network 的核心操作拆成了三步:
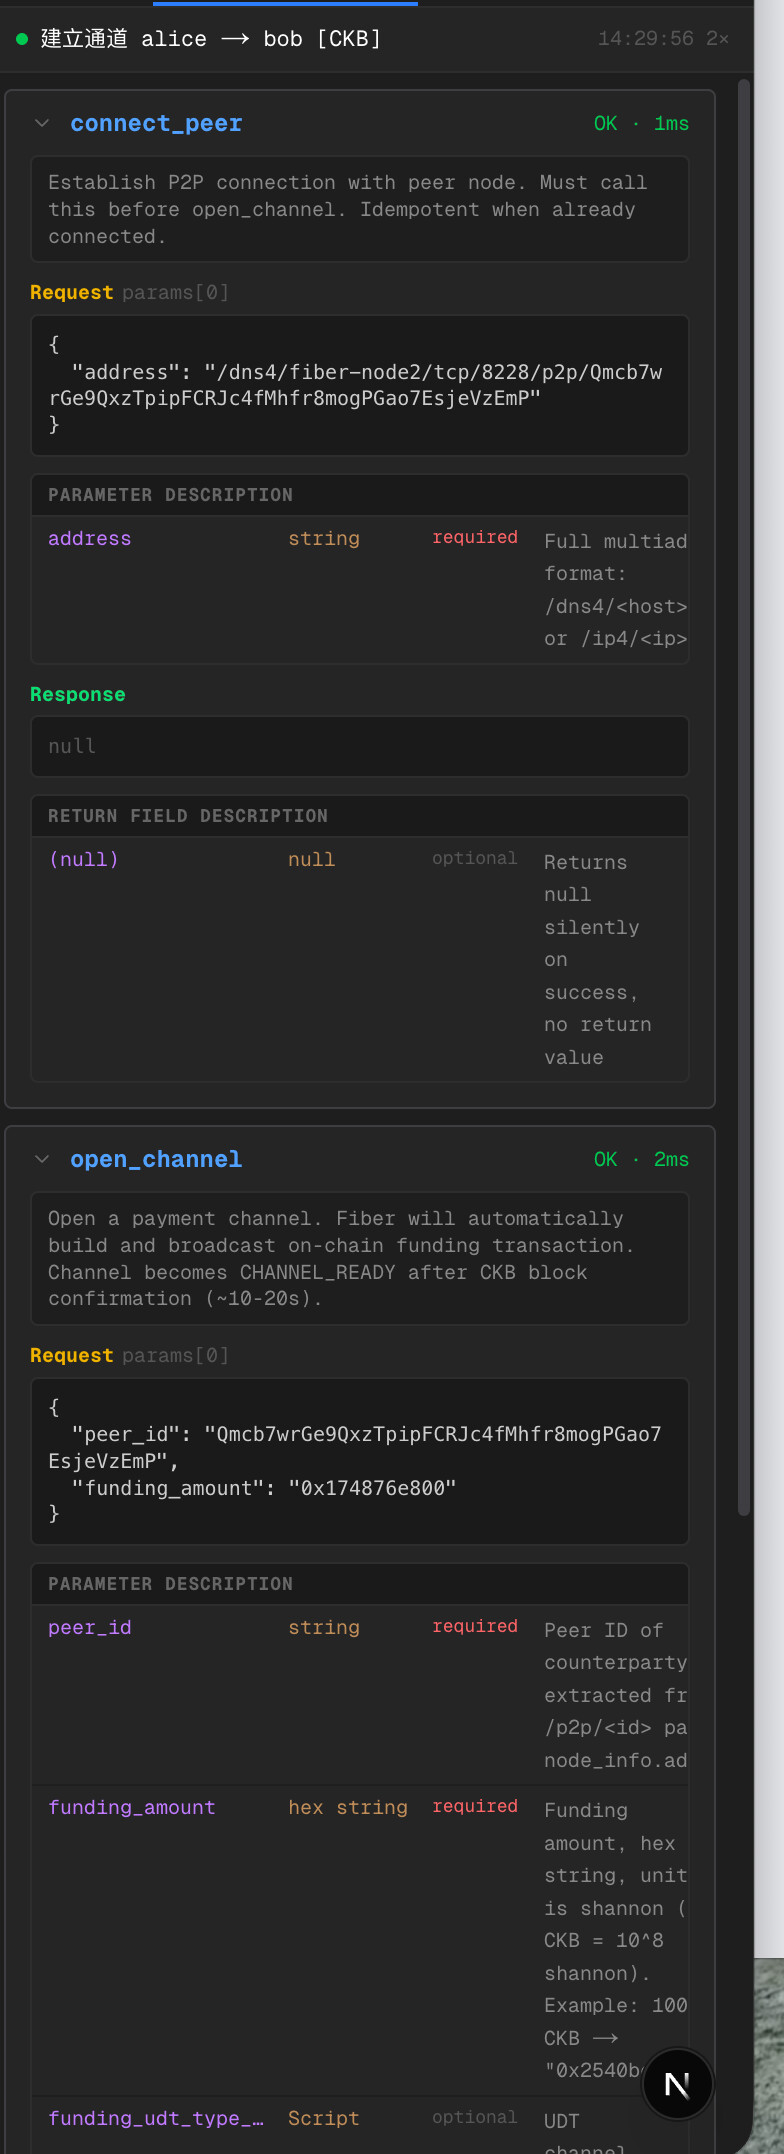
第一步:P2P 连接
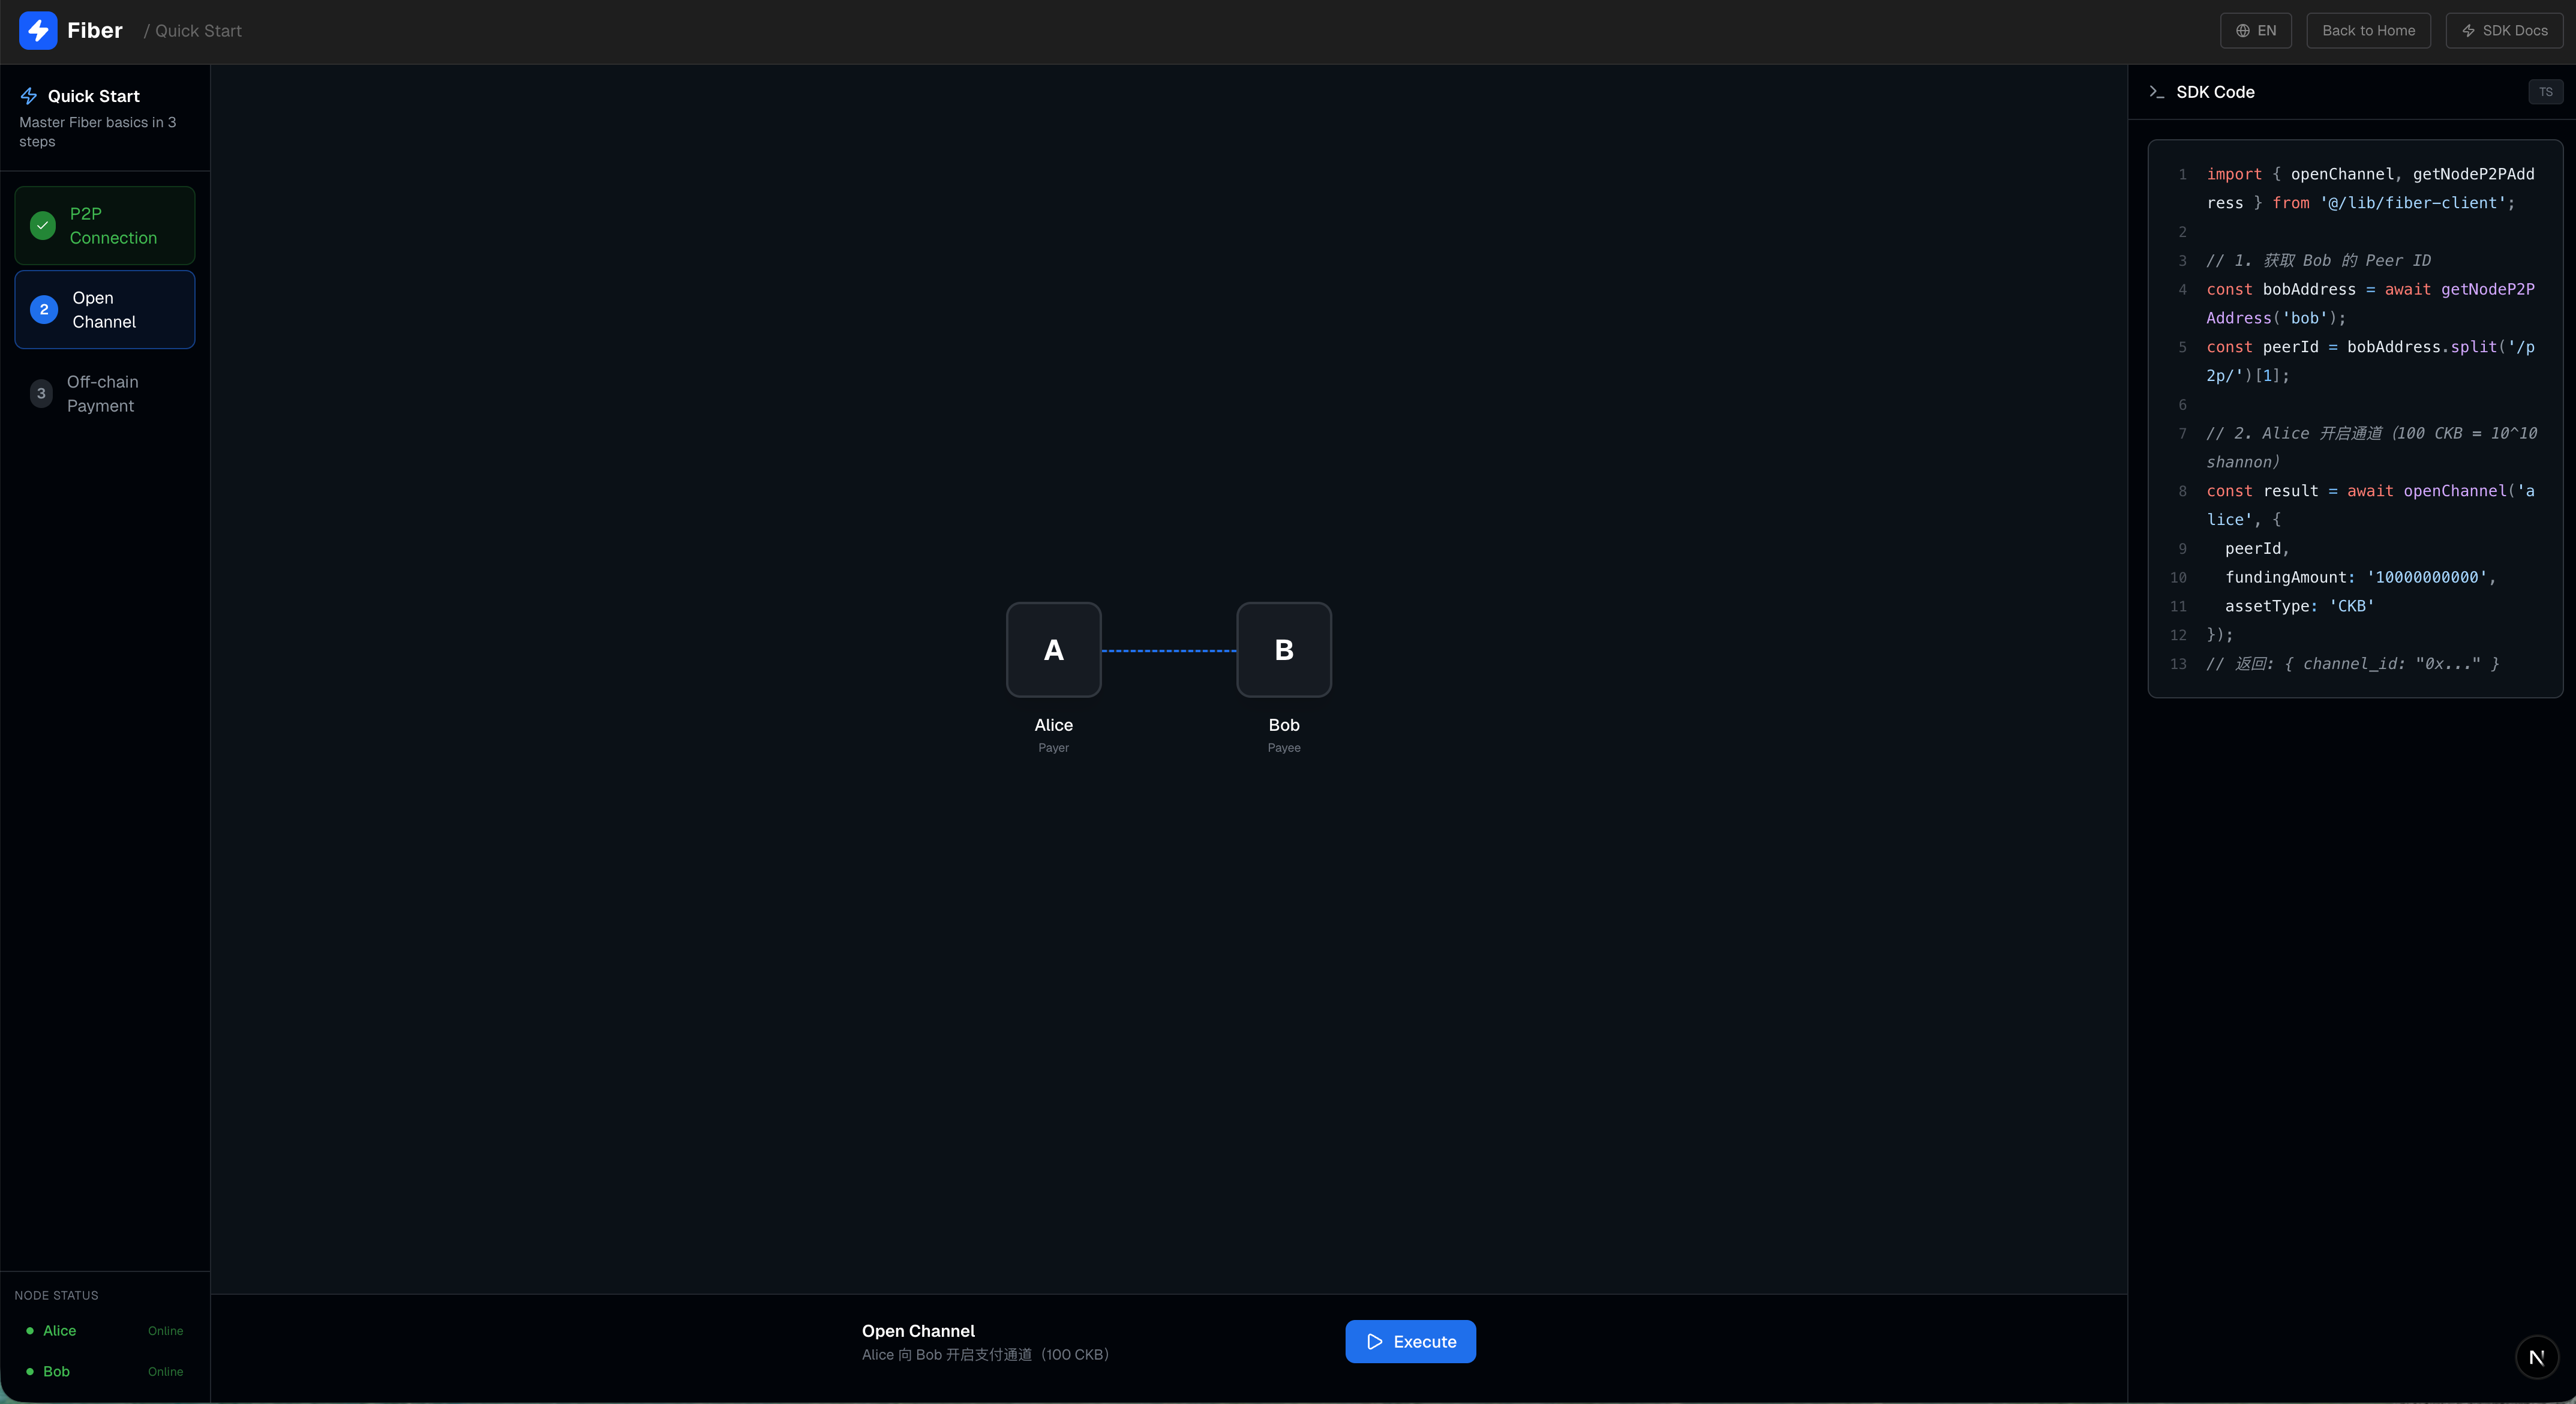
一切从连接开始。界面左边是步骤导航,中间是一个拓扑图,显示 Alice 和 Bob 两个节点,右边是对应的 TypeScript 代码示例。
点击"执行"按钮,Alice 就会连接到 Bob 的 P2P 网络。界面上会实时显示:
-
连接线从虚线变成蓝色实线
-
RPC 调用记录展开,你可以看到
connect_peer方法的参数和返回值 -
代码面板里的代码可以一键复制
第二步:建立支付通道
P2P 连接只是第一步,要转账还得先开通道。这一步会调用
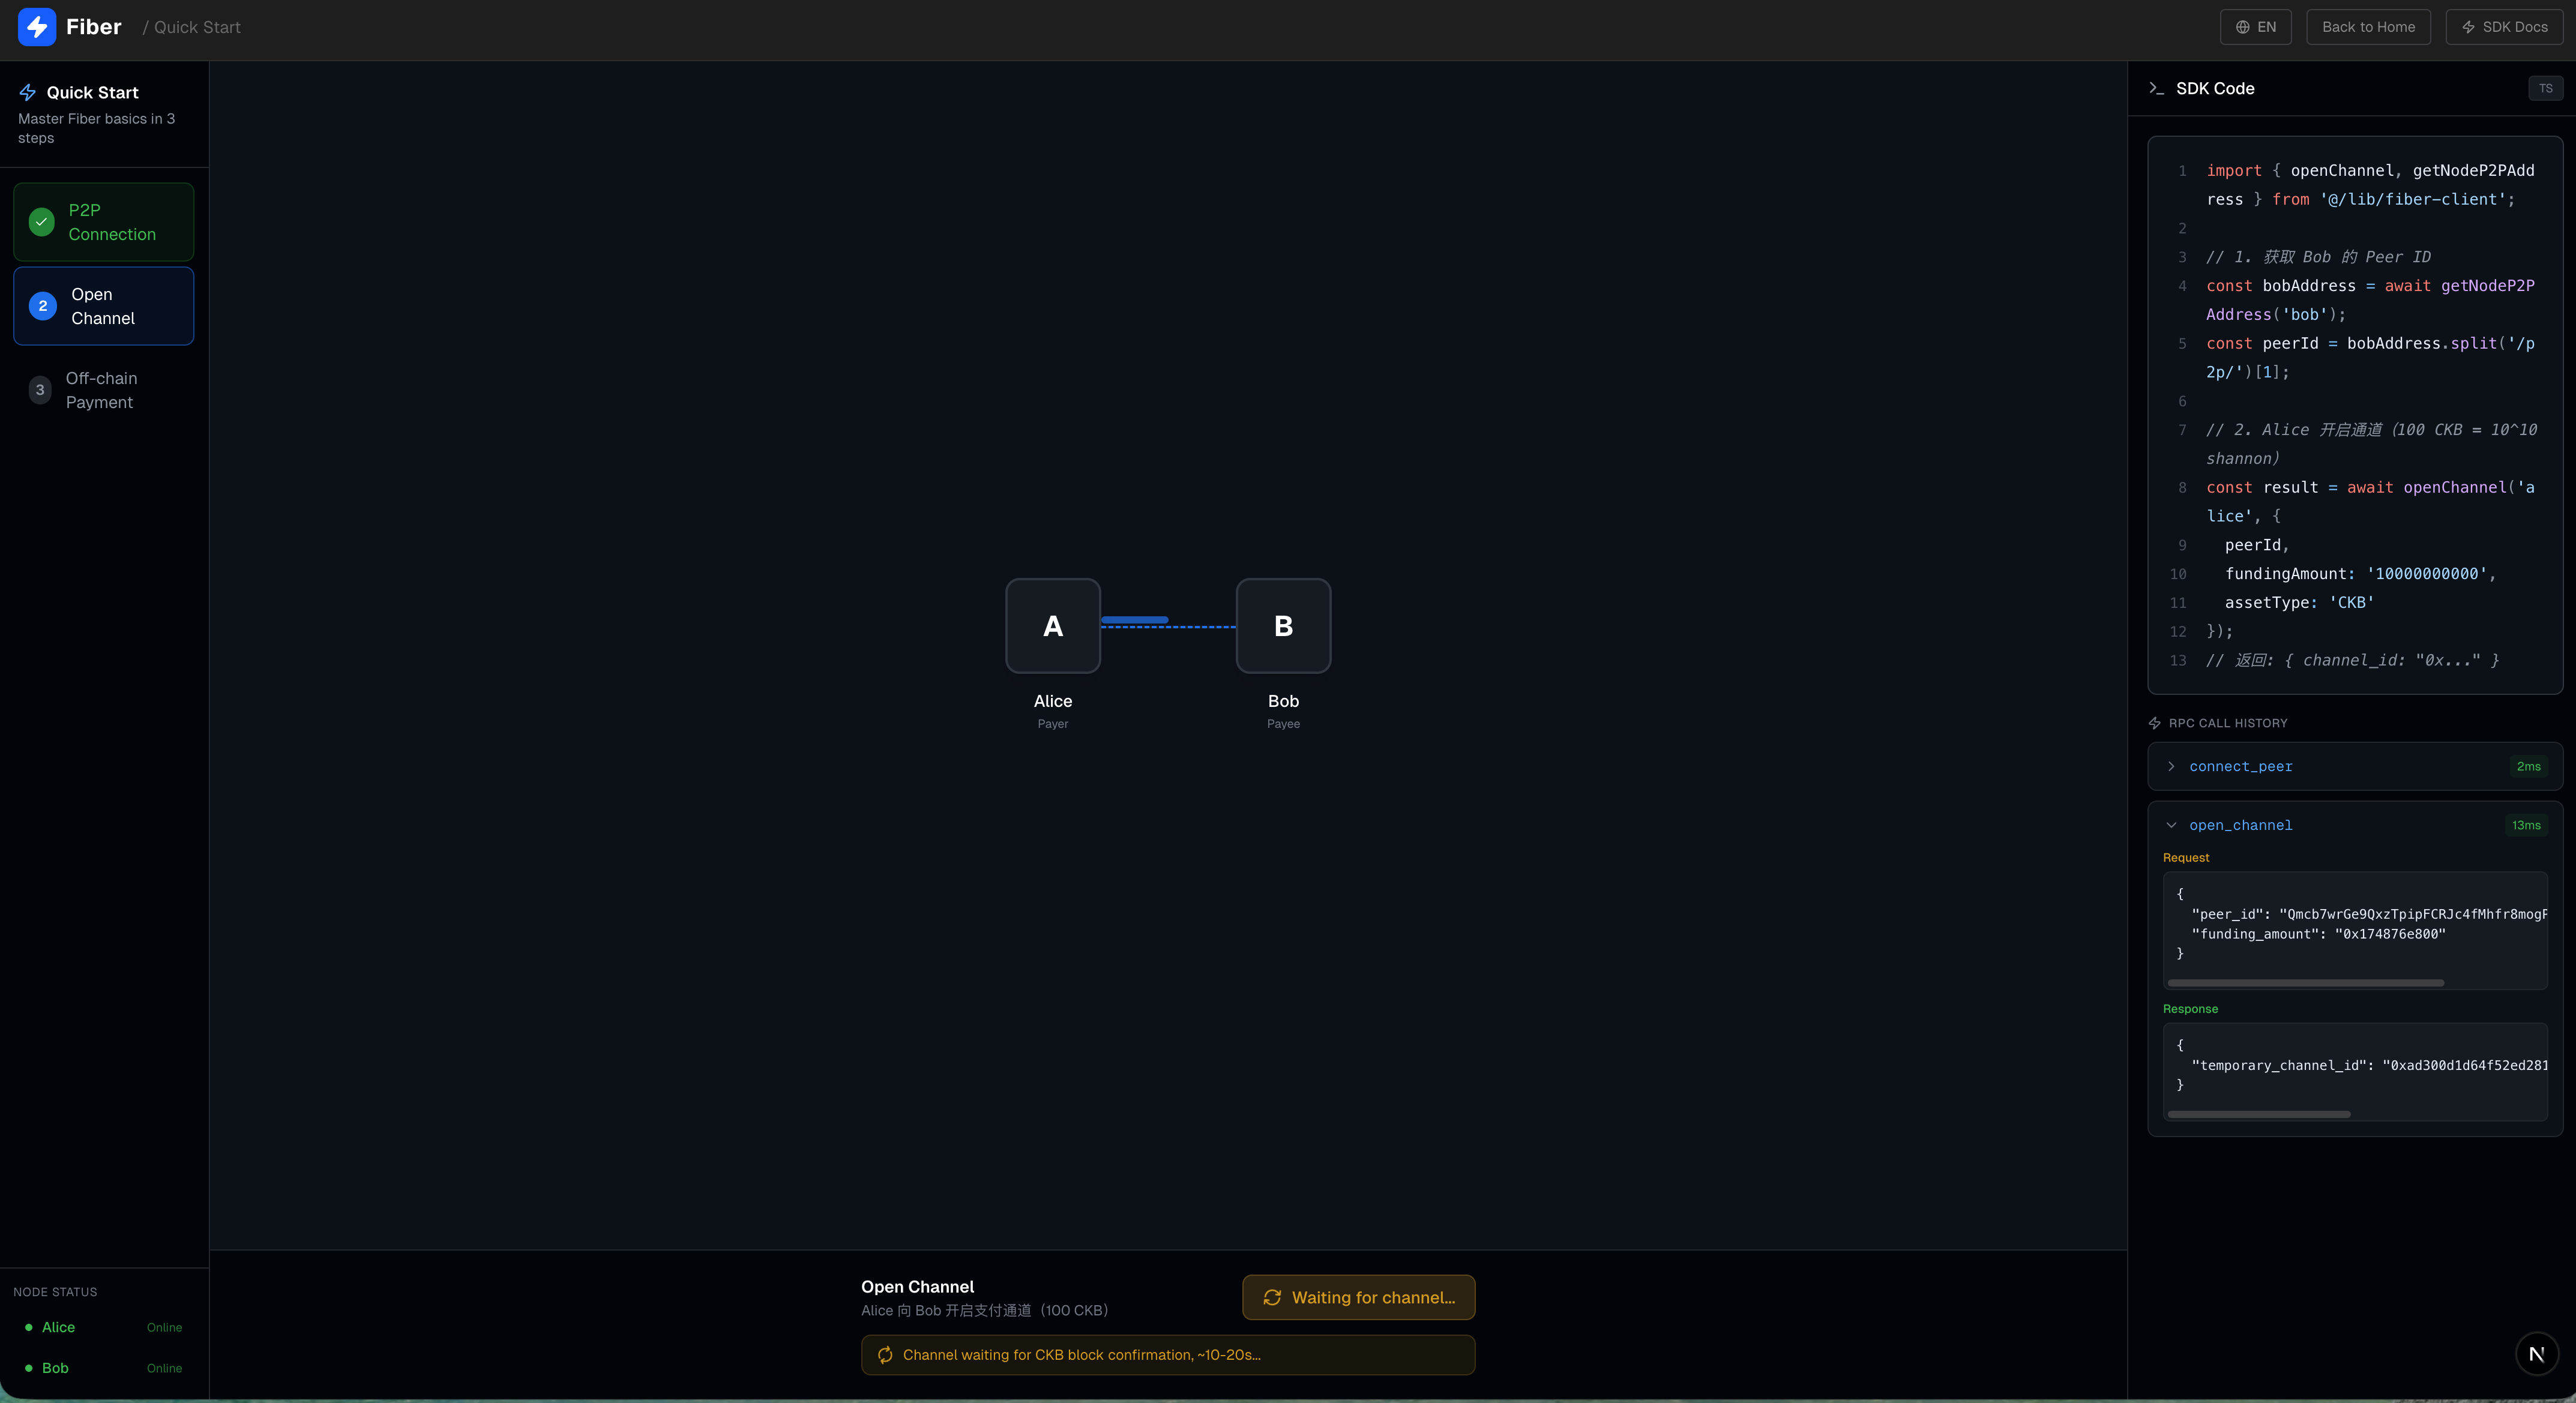
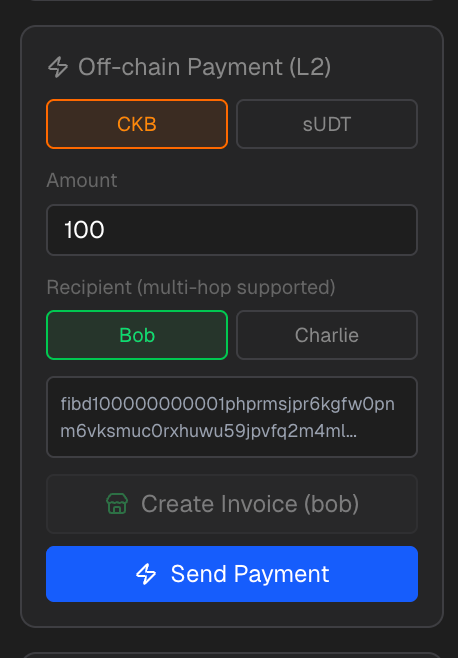
open_channel 方法,Alice 向 Bob 开启一个 100 CKB 的支付通道。界面上会显示通道正在建立中的动画状态,以及底层需要等待链上确认。
第三步:链下支付
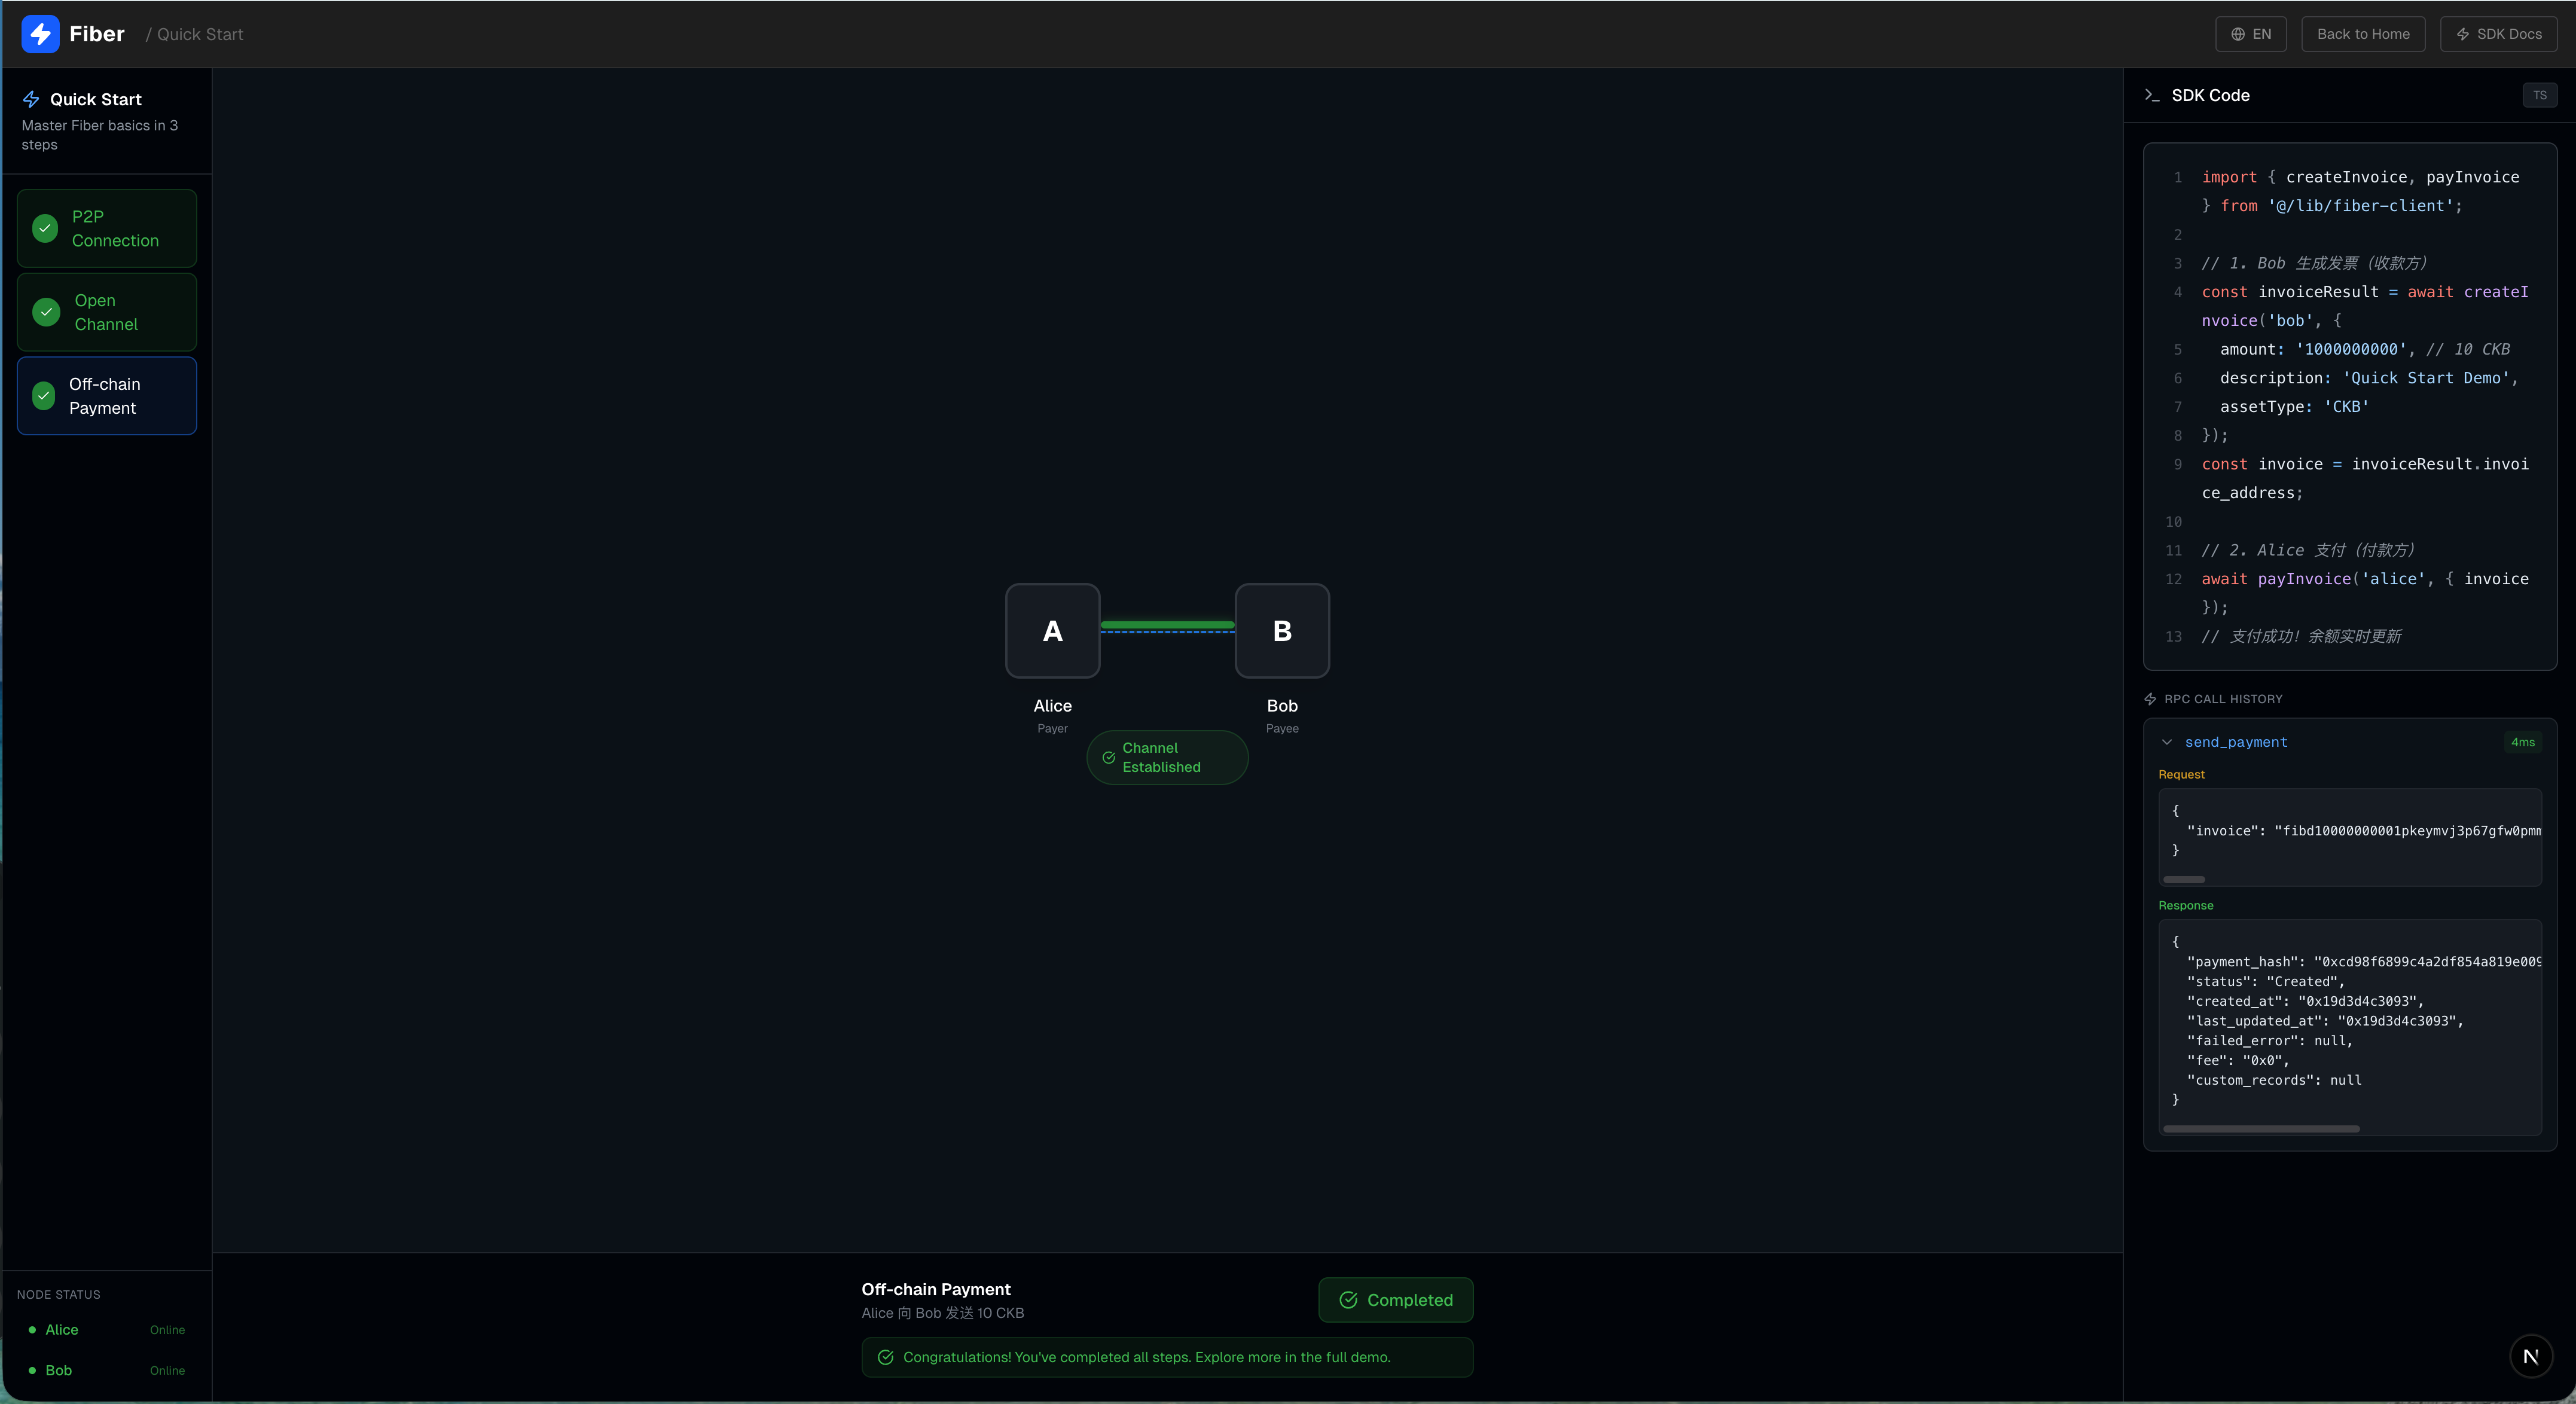
通道建好了,终于可以转账了!这一步模拟了一个真实的支付流程:界面上会显示支付动画——一个小光点沿着通道连线从 Alice 飞向 Bob。
完成这三步,你就已经体验了 Fiber Network 的核心流程!
完整演示:欢迎来到你的 Fiber 控制面板
想象一下:你面前是一张动态的数字画布,上面静静铺展着一个微型支付网络——这不是抽象的概念图,而是一个真实运行的 Fiber Network 测试环境。你可以点一点、拖一拖,甚至看着资金像光一样在节点之间流动。这就是 完整演示模式:你的实验沙盒,也是理解 Fiber 如何工作的最佳窗口。
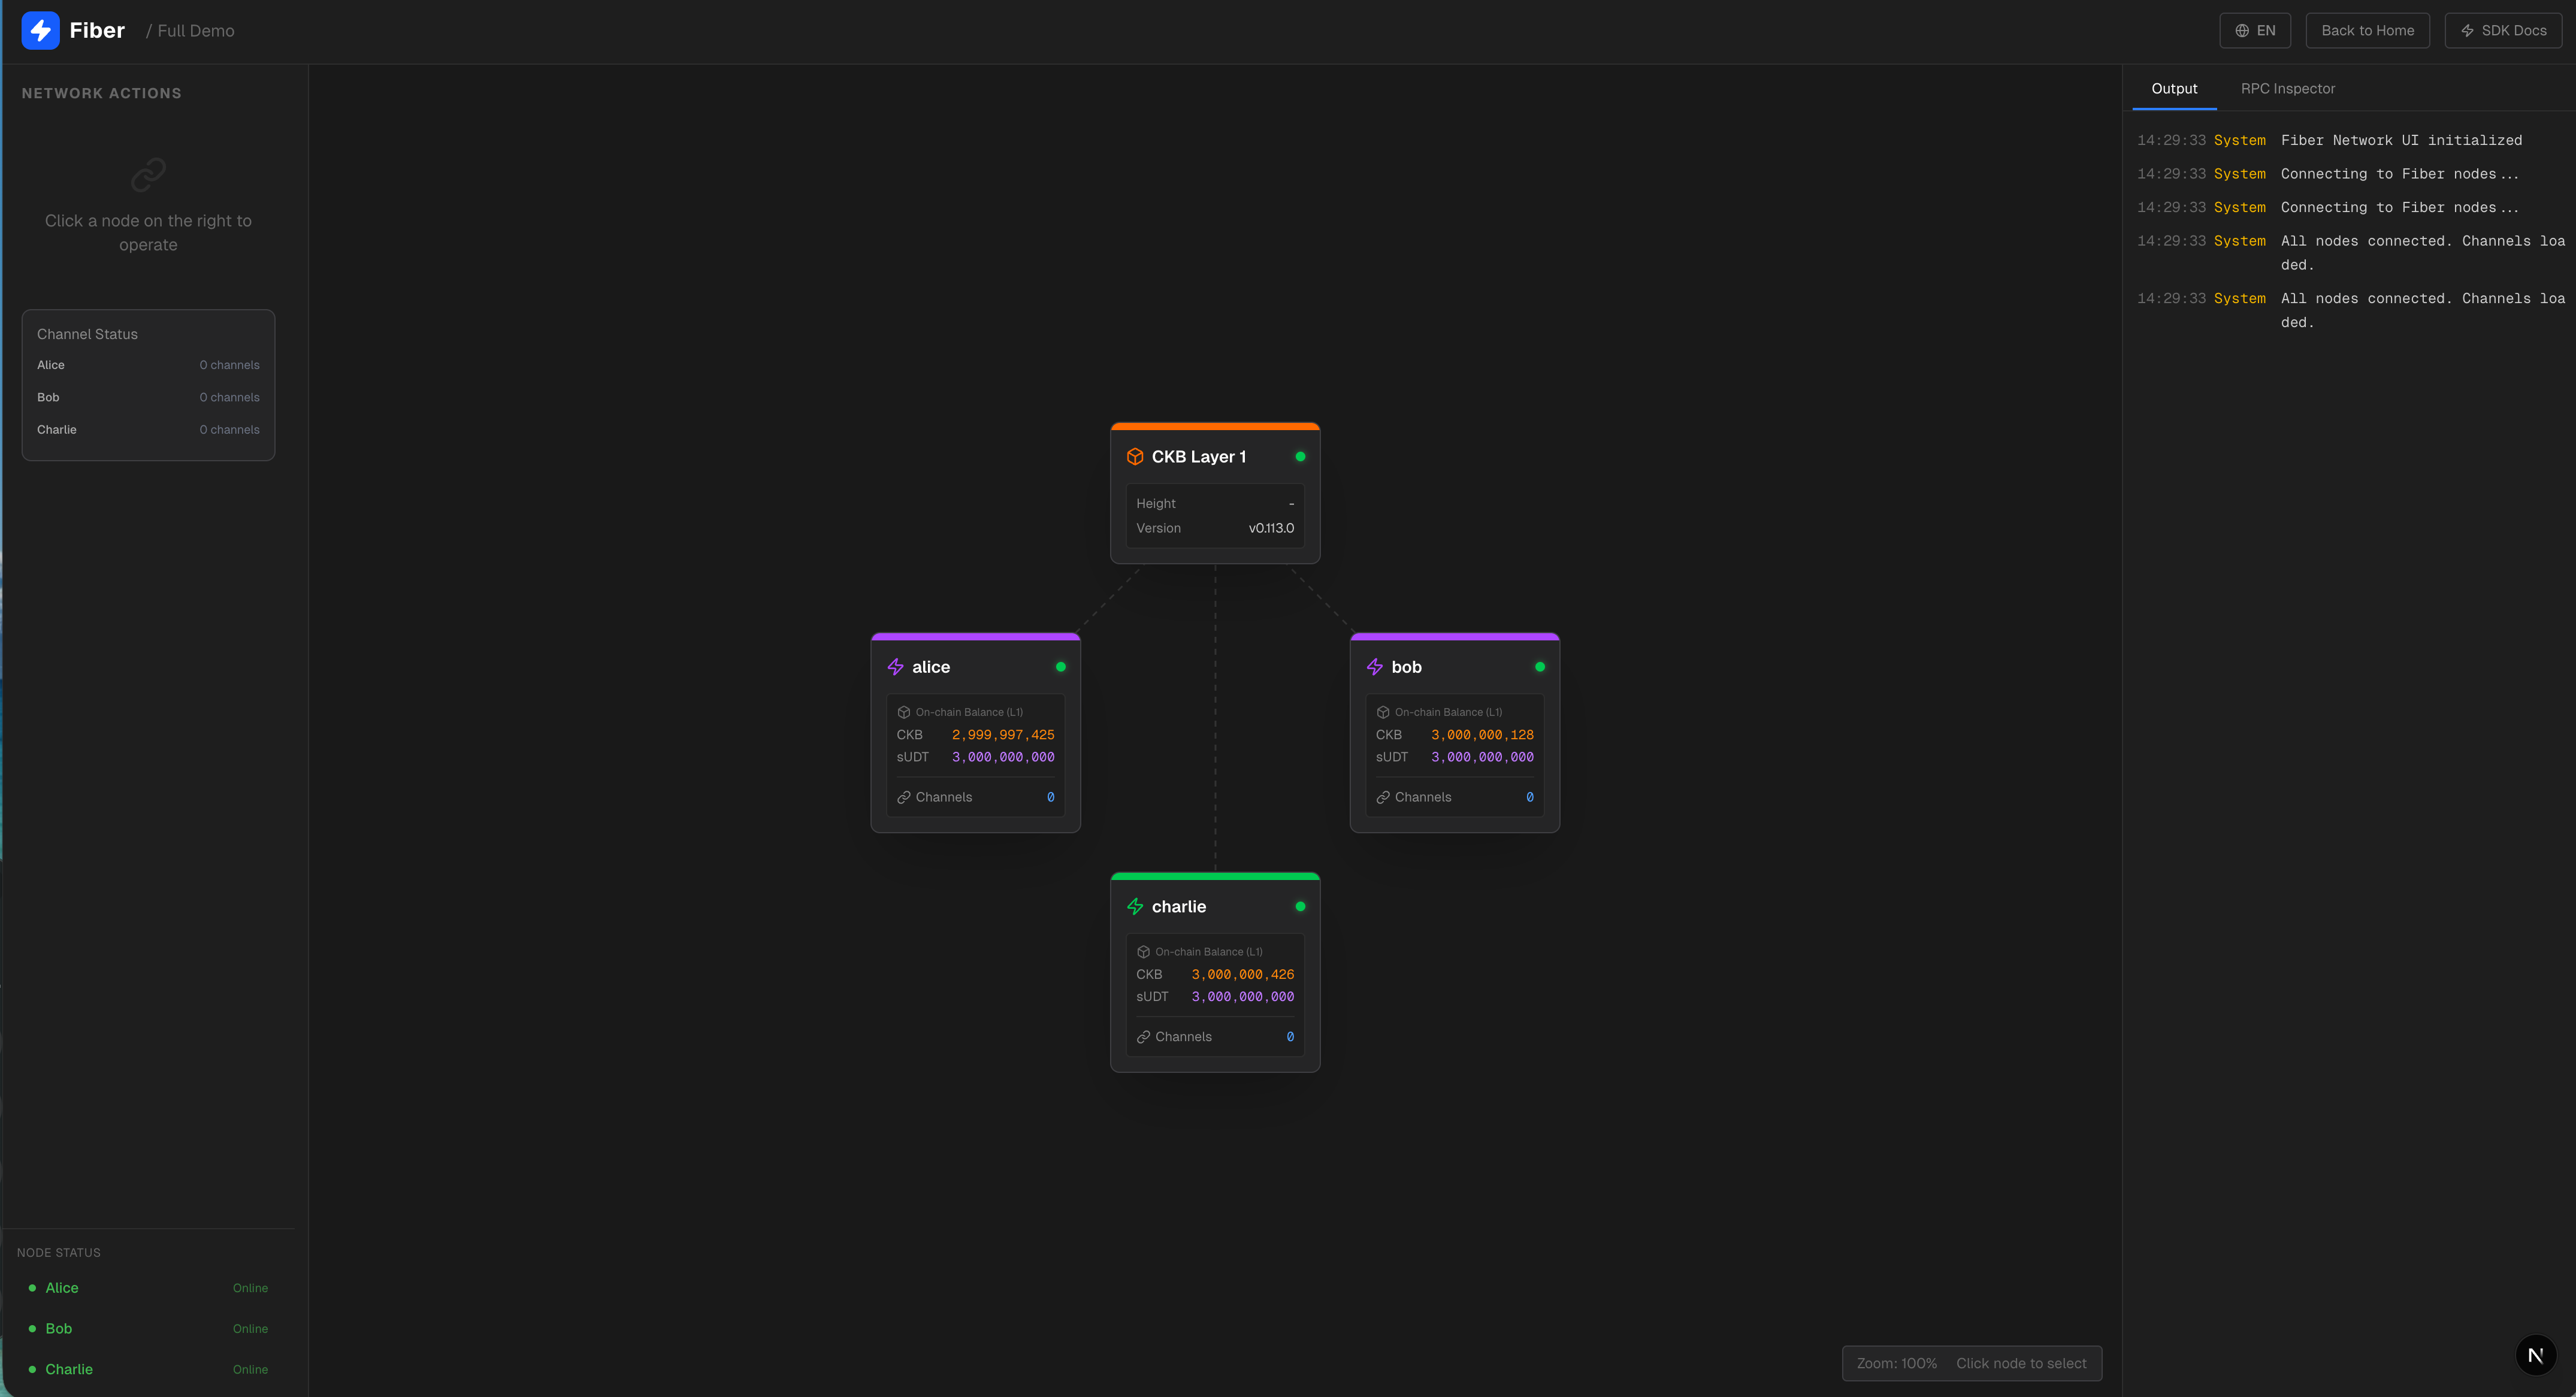
一眼看清整个网络
画布中央,是整套系统的“地基”——CKB Layer 1 节点。它稳稳地坐在顶部,显示着当前区块高度和节点版本,默默为上层提供安全保障。而在它之下,三个角色各就各位:
-
Alice 在左上角,是个普通用户(user),就像你我;
-
Bob 在右上角,身份是路由节点(router),负责传递支付;
-
Charlie 坐在底部中央,是一位商户(merchant),随时准备收款。
它们之间尚未连接,但只需一次点击,通道就能建立,资金便能穿梭。
左侧边栏:你的操作中枢
这里是你与 Fiber 交互的核心。根据所选节点不同,面板内容会智能调整,但核心功能始终围绕三件事:建通道、关通道、发支付。
建立通道:从链上到链下的第一步

想让 Alice 和 Bob 开始交易?只需在“建立通道”区域选择 Bob 作为目标,再挑一种资产——可以是原生 CKB(默认 100 CKB),也可以是 sUDT。点击确认后,界面上立刻浮现出“确认中…”的提示。
此时,一条虚线开始在 Alice 与 Bob 之间闪烁跳动,这是通道正在等待链上确认。大约 10 到 20 秒后,虚线凝实为一条连线,通道状态变为绿色“已就绪”——现在,他们可以在链下高速、低成本地转账了。
发起支付:让价值如光流动
这才是最令人兴奋的部分。
支付分两步走,模拟真实场景:
-
开票:在面板里选择资产类型、输入金额,点击“生成发票”。系统立刻调用
new_invoice,吐出一串形如fibd1qp...的发票字符串。 -
支付:点击支付即可进行链下支付
如果 Alice 和 Charlie 之间没有直连通道?没关系。只要他们都连着 Bob,光点就会先飞到 Bob,再转向 Charlie。这就是 多跳路由:Fiber 自动为你找到最优路径,无需预设,也无需信任中间人。
支付成功后,所有相关通道的余额实时更新,右侧日志面板同步刷出详细记录。
关闭通道:安全退出,资金归位
当通道不再需要,你可以随时关闭它。每条通道都以卡片形式呈现:
-
标签清晰标明是 CKB 还是 UDT;
-
显示对端是谁(比如 “→ Bob”);
-
用颜色区分状态:绿色表示可用,黄色表示尚在确认;
-
底部还有一条精巧的余额分布条:蓝色是你拥有的部分,紫色是对端的。
只有“已就绪”的通道才能关闭。一旦点击关闭按钮,通道内资金会结算回 CKB 链上,你甚至能亲眼看到节点卡片上的链上余额随之增加——闭环完成,安心无忧。
通道状态区:全局视野,一目了然
在边栏底部,有一个“通道概览”区域。每个节点占一行,显示它当前拥有几条通道。展开后,你能看到每条通道的资产类型、对端、状态,甚至确认中的通道还会配上一个小小的旋转图标——安静却充满信息量。
右侧面板:双重视角,洞察一切
右侧采用双标签页设计,满足不同阶段的需求。
Output 标签:实时日志,如影随形
这里像一个终端窗口,滚动着系统的心跳:
14:32:15  Request  alice     open_channel { to: 'bob', amount: '100000000000' }
14:32:35  System   channel_ready  alice → bob 通道已就绪
14:32:45  Request  alice     send_payment { invoice: 'fibd1qp...' }
14:32:46  Response alice     send_payment { status: 'Success' }
不同颜色标识不同类型的消息:黄色是系统通知,蓝色是请求,绿色是响应,红色则是错误。日志自动滚动到底部,让你永远聚焦于最新动态。
RPC Inspector 标签:开发者的“活文档”
如果你是开发者,这个标签页的作用会比较大。每一次操作,都会在这里留下完整的 RPC 调用记录。
点击任意一条历史记录,你会看到:
-
方法名称与耗时(比如
open_channel · 156ms); -
清晰的说明:“这个方法用于开启支付通道…”;
-
参数表格,逐字段解释用途;
-
实际传入的 JSON 参数;
-
以及返回结果。
失败时,它还会高亮错误信息。不用翻文档,不用猜参数——所见即所用。这就是“活的 API 文档”。
这个控制面板,不只是一个演示工具。它是通往 Fiber 世界的一扇窗:透过它,你能亲手搭建通道、发起跨节点支付、观察资金流转,甚至调试底层 RPC。无论你是好奇的用户、探索的开发者,还是研究 Layer 2 架构的研究者,这里都为你留好了位置。
现在,轮到你了——点一下 Alice,试试那笔 50 CKB 的支付吧。光点已经在等你了。
Fiber JS SDK:把复杂藏在背后,把简单交给你
Fiber 节点本身暴露的是标准的 JSON-RPC 接口——从技术上讲,你只要用 fetch 发个请求,就能和它对话。但现实往往没那么理想。
想象一下:你想开一个支付通道,却要手动把金额转成十六进制、拼上 0x 前缀;想用 UDT,还得翻出上次记下的 code_hash 和 args,小心翼翼地填进 type_script;调用失败时,返回的错误信息像天书一样难懂……这些琐碎的“摩擦”,一点点消磨开发体验。
于是, 这个项目做了一件事:把重复、易错、低效的部分,统统封装进一个轻量而智能的 Fiber JS SDK 里。
一段代码,两种世界
来看个对比。
不用 SDK(原始 RPC):
const res = await fetch("http://127.0.0.1:10001", {
  method: "POST",
  headers: { "Content-Type": "application/json" },
  body: JSON.stringify({
    jsonrpc: "2.0",
    method: "open_channel",
    params: [{
      peer_id: peerId,
      // ⚠️ 必须是十六进制字符串,不能直接传数字
      funding_amount: "0x" + BigInt(amount).toString(16),
      // ⚠️ UDT 通道?得自己构造完整的 type script
      funding_udt_type_script: {
        code_hash: "0xe1e3...",
        hash_type: "data",
        args: "0xc219..."
      }
    }],
    id: Date.now()
  })
});
光是注释里的警告,就让人头皮发麻。
用了 SDK 之后:
import { openChannel } from "@/lib/fiber-client";
const result = await openChannel("alice", {
  peerId: "QmXb...",
  fundingAmount: "10000000000",   // ✅ 直接传数字字符串
  assetType: "UDT"                // ✅ 自动注入正确的 UDT type script
});
是不是像换了种语言?参数变得“人类友好”,逻辑清晰,意图一目了然。
SDK 到底替你扛下了什么?
-
格式自动转换 所有涉及链上格式的字段,SDK 都默默帮你处理好了:
-
金额(以 shannon 为单位)自动从十进制转为带
0x前缀的十六进制; -
过期时间(expiry)从秒数自动转为十六进制字符串;
-
不再需要手动拼接、不再担心格式错误。
-
资产类型智能封装 UDT 的
type script?不用每次复制粘贴。SDK 内置了常见资产(如 Fibd、Fiber)的配置,你只需指定assetType: "UDT",它就知道该用哪个code_hash和args。甚至currency字段也会根据当前网络环境自动填充。 -
错误处理更人性化 无论是 HTTP 层的 500 错误,还是 JSON-RPC 返回的
-32602,SDK 都会统一抛出带有清晰描述的 JavaScript 异常。你可以用熟悉的try/catch捕获,调试效率大幅提升。 -
可观测性开箱即用 每个方法都提供一个
WithTrace版本(比如openChannelWithTrace),自动记录完整的请求、响应和耗时,并将数据推送到演示应用中的 RPC Inspector 面板。开发时,你不仅能知道“有没有成功”,还能立刻看到“为什么成功”或“哪里出了问题”。
它覆盖了哪些能力?
专属文档页:不只是参考,更是引导
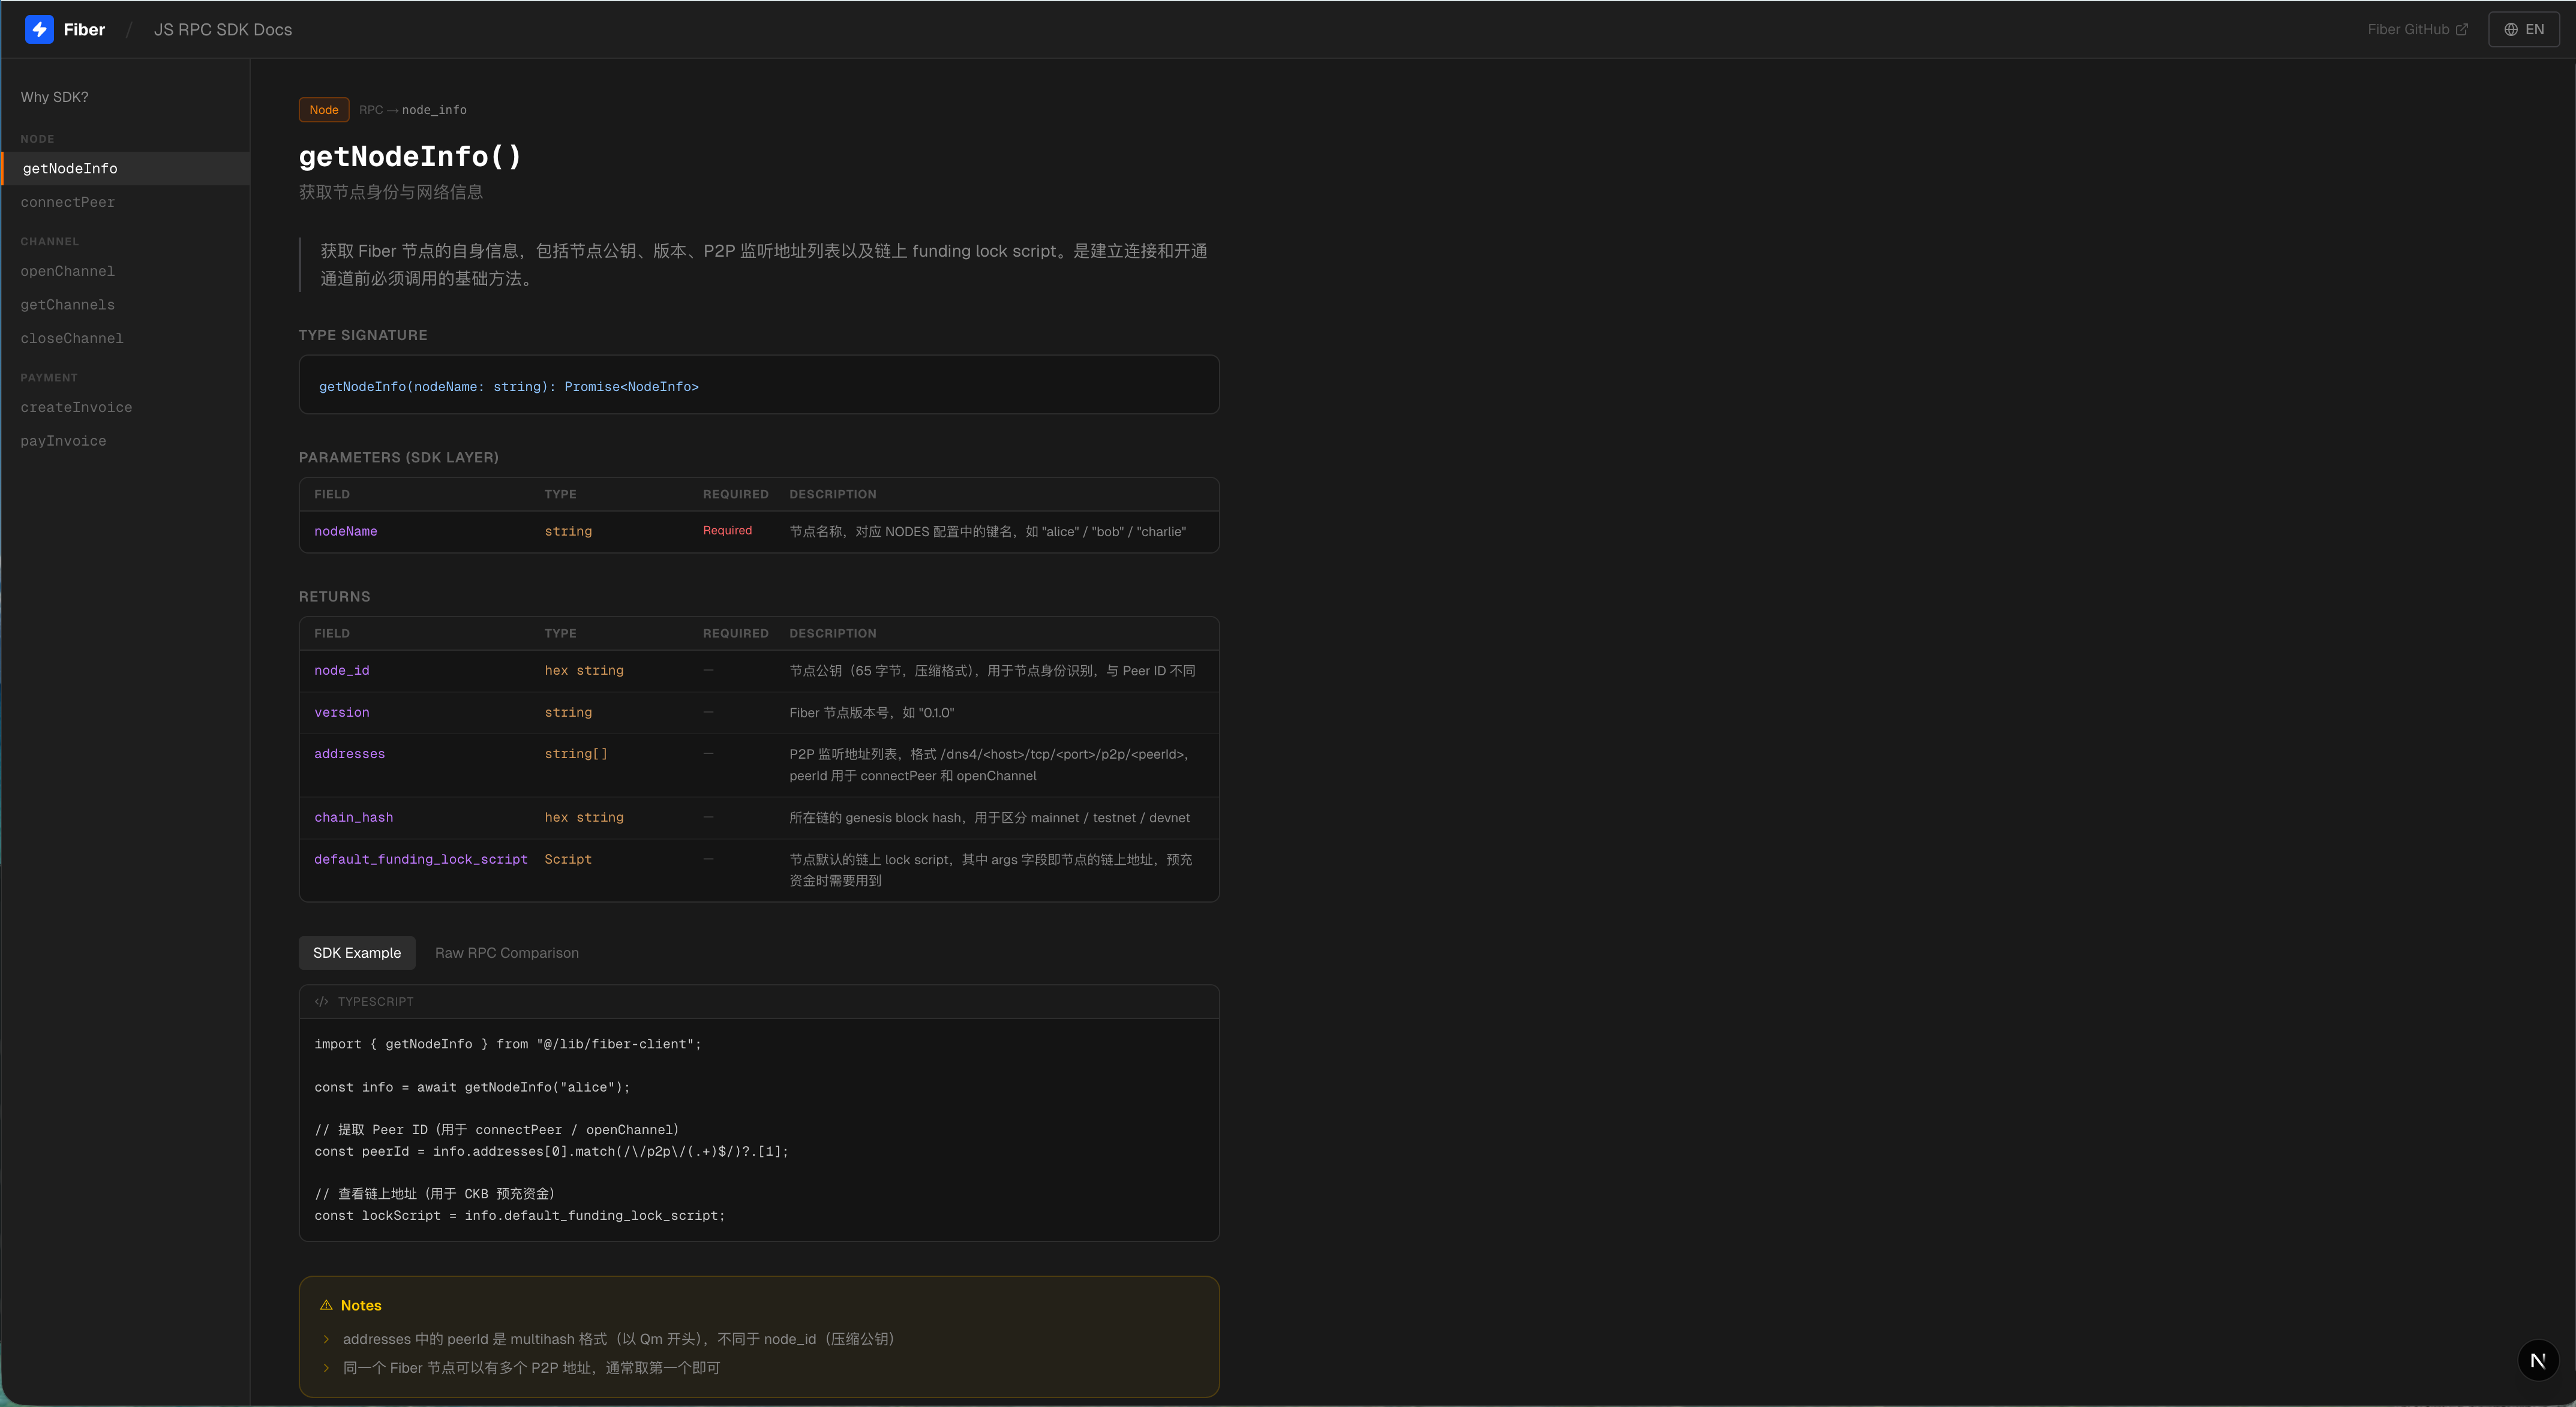
SDK 目前聚焦了 Fiber 最核心的交互场景,包括:
-
节点连接(
connectPeer) -
通道管理(
openChannel,closeChannel,listChannels) -
支付操作(
sendPayment,newInvoice,lookupInvoice) -
网络查询(
getInfo,listPeers)
每个方法都配有完整的 TypeScript 类型定义,配合现代 IDE,自动补全、参数提示、错误检查一应俱全——写代码
专属文档页:不只是参考,更是引导
在演示应用顶部导航栏,点一下 “SDK Docs”,你会进入一个专为开发者打造的文档空间。
首页就用对比表格告诉你:“为什么你需要这个 SDK?”——左边是原始 RPC 的繁琐写法,右边是 SDK 的简洁调用,差异一目了然。还附赠一份 Raw RPC 易错点速查表,比如:
-
所有金额必须是十六进制字符串;
-
new_invoice必须显式指定currency; -
list_channels的参数是[{}],不是空数组[]; -
开通道前,务必先调用
connect_peer……
进入任意方法的详情页,你能看到:
-
清晰的 TypeScript 函数签名;
-
参数说明表格(字段名、类型、是否必填、用途);
-
返回值结构详解;
-
双栏代码示例:左边 SDK,右边原始 RPC,可一键切换;
-
“注意事项”板块,提前预警那些只有踩过坑才懂的细节。
这个文档页面完全独立,即使你不在演示环境中,也可以当作日常开发的 API 手册随时查阅。
Fiber JS SDK 的目标很简单:让开发者专注业务逻辑,而不是底层协议的边角料。它不炫技,不堆功能,只做一件事——把那些本不该由你操心的细节,处理好。
现在,你可以用一行代码打开通道,用一次函数调用完成跨节点支付,用清晰的错误提示快速定位问题。而这背后的一切复杂,都被 SDK 静静挡在了你看不见的地方。
毕竟,好的工具,就该让你感觉不到它的存在——只感受到效率。
一些细节
关于构建时间
第一次运行 docker compose up --build 的时候,需要从源码编译 CKB 和 Fiber,时间会相对较长。但是只需要一次,后面就快了。
关于语言
演示应用支持中英文切换,照顾不同背景的朋友。
谁适合用这个?
我觉得这几类朋友会感兴趣:
-
想学习 Fiber Network 的人:不用折腾环境,跟着三步走就能理解核心概念
-
想演示 Fiber 功能的人:可视化的控制面板,展示起来很直观
-
想开发 Fiber 应用的人:SDK 让你快速上手,文档页面随时查阅,本地环境随时测试
-
想体验 CKB 支付通道的人:感受一下 Lightning Network 风格的链下支付
最后
这个项目解决的问题很小,就是帮你省去搭环境的时间。但我相信,降低入门门槛这件事,对于技术推广来说是很重要的。
如果你对 Fiber Network 感兴趣,不妨试一试,有问题也欢迎提 issue 或者找我交流。
希望对你有帮助!
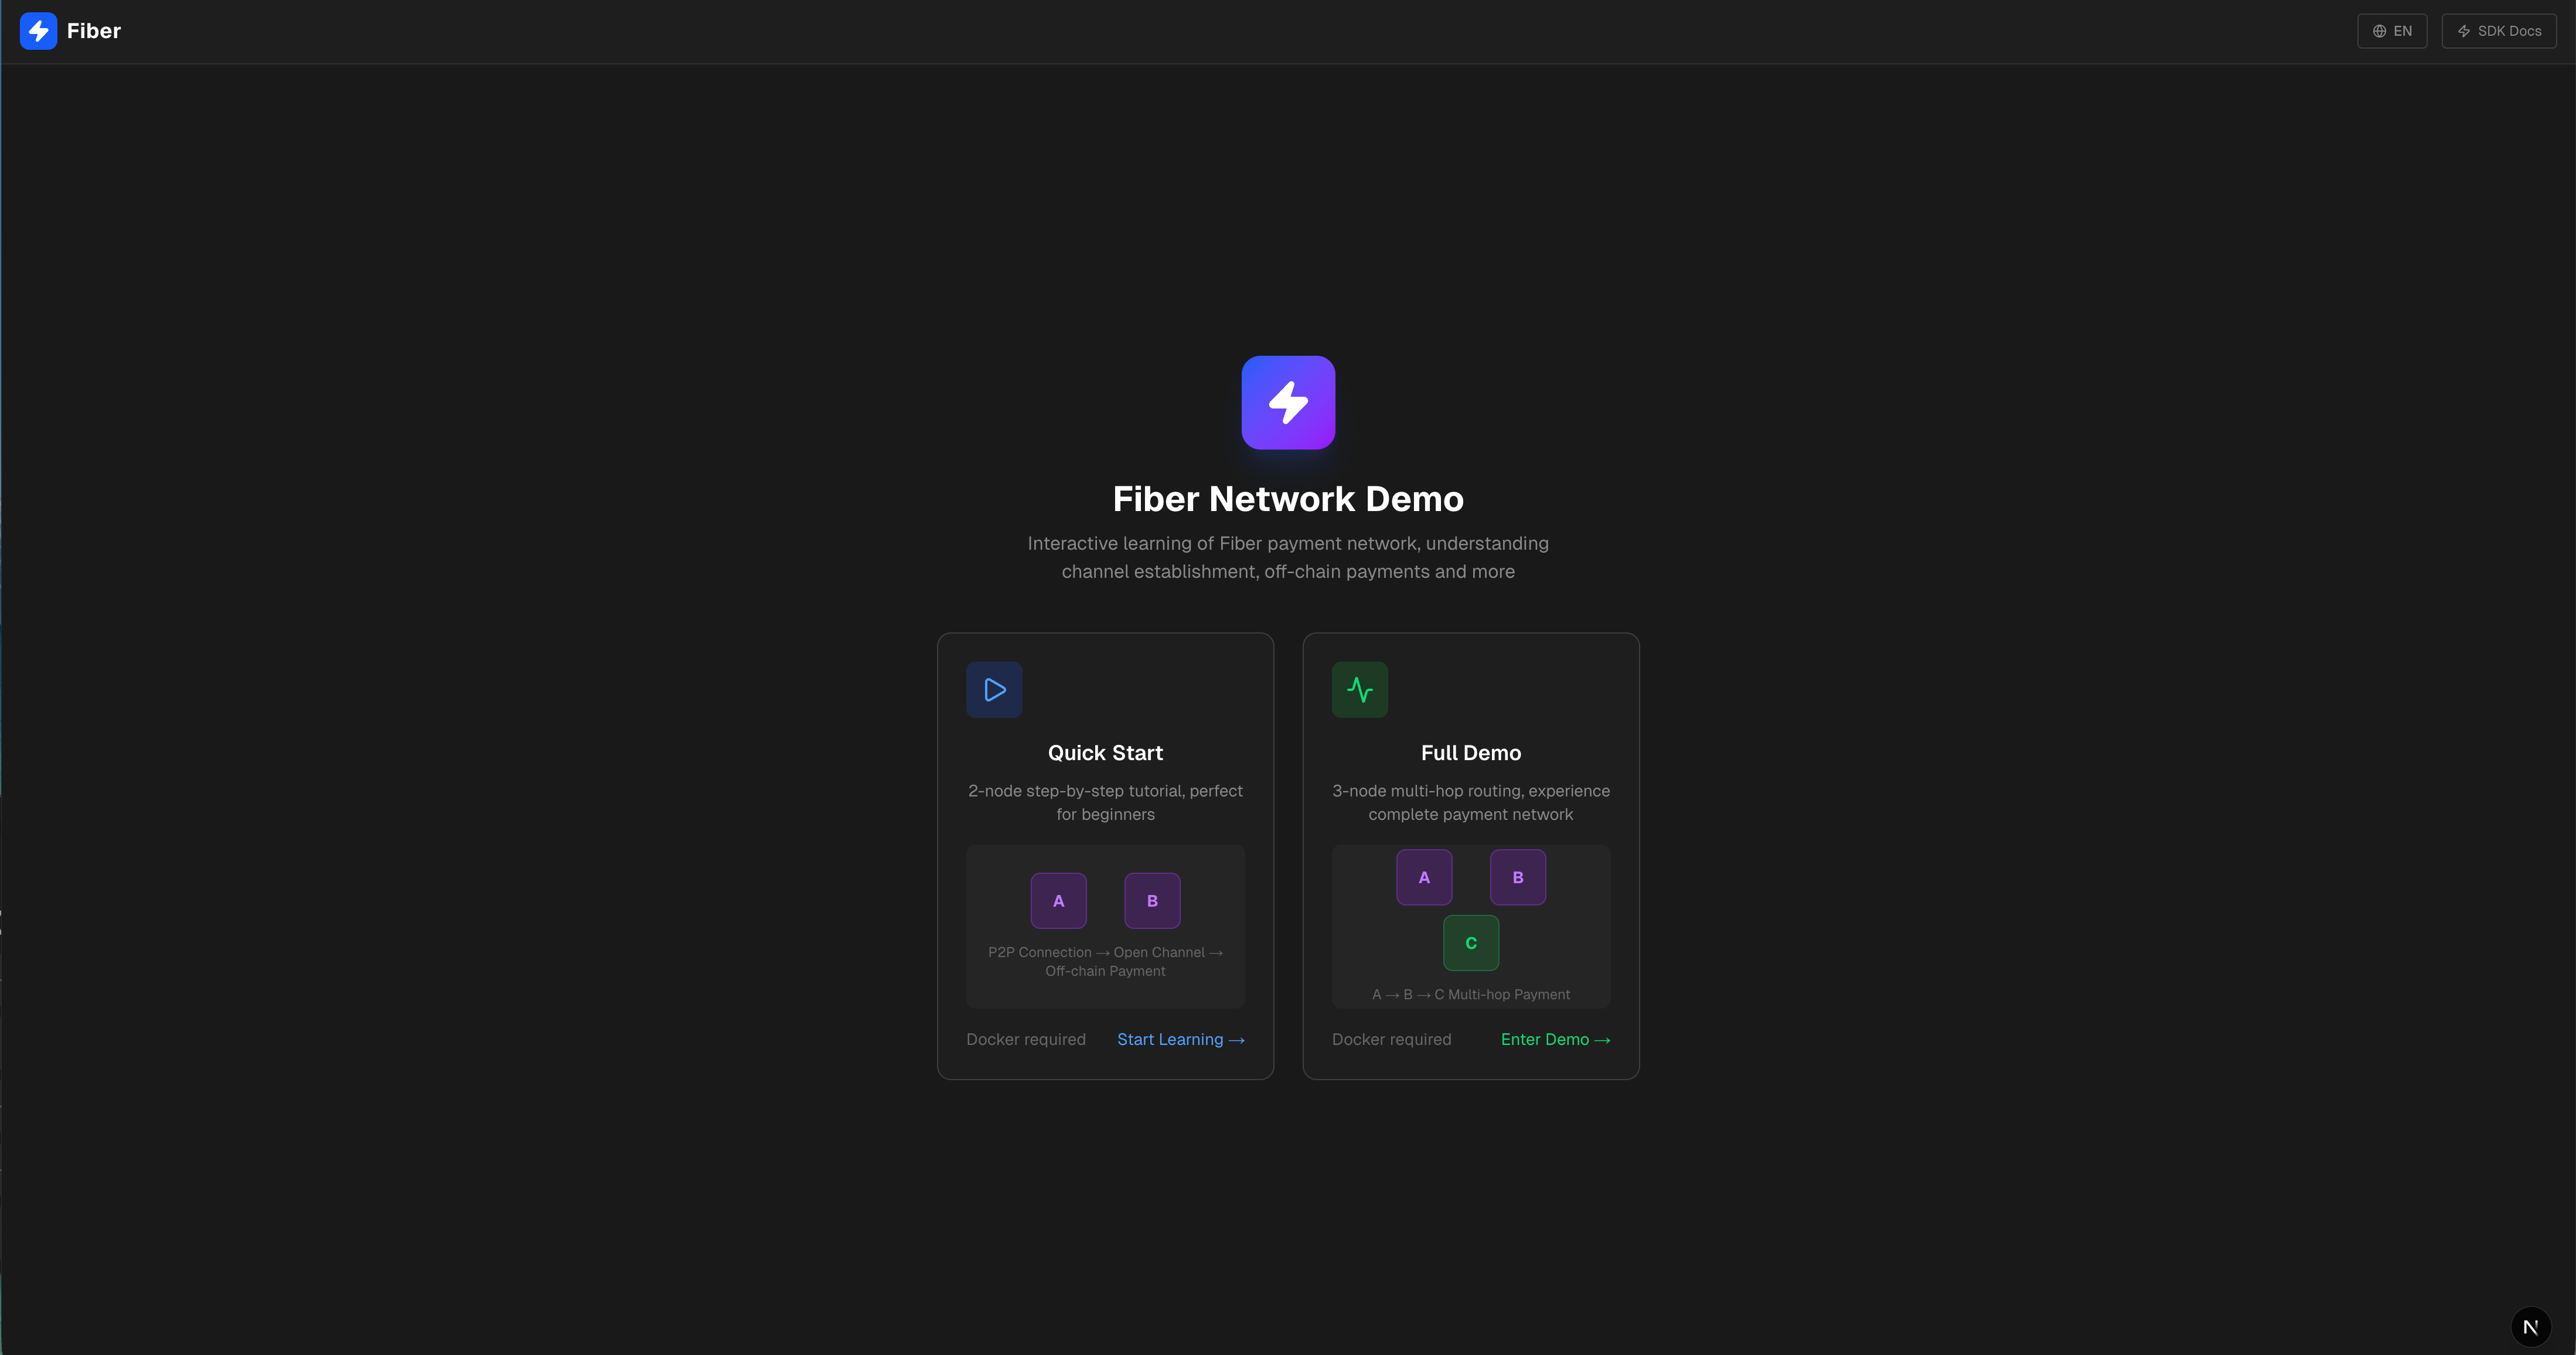
One-click start Fiber Network
Hi, everyone!
Recently, an idea has been swirling in my mind —— Fiber Network is truly an amazing thing. It’s a Lightning Network-style payment channel that runs directly on CKB and can also support native CKB and UDT tokens. But every time I want to experience it, I always have to spend a long time setting up the environment… Can we make this a bit simpler?
Thus came the project of Fiber Demo Startup.
Cause: A pain point that everyone understands
Do you know that feeling? When you want to learn a new technology, just setting up the environment can take half a day. Download this, compile that, keep changing configuration files, and also need to recharge your account with test tokens… By the time the environment finally runs, half of your enthusiasm is gone.
So my goal is very simple:One-click start, Out Of The Box.
What is it?
In a nutshell: This is a complete Fiber Network local development demonstration environment, with everything packaged for you.
You only need two steps:
# 第一步:启动基础设施
docker compose up --build
# 第二步:启动演示应用
cd app && pnpm dev
Then open a browser and visit http://localhost:3002, and you will see an interactive demo interface.
What’s inside?
Infrastructure Layer (Docker)
The project will automatically start for you:
-
CKB Development Chain: A local test chain with built-in miners, where contracts (FundingLock, CommitmentLock, simple_udt, etc.) are already deployed for you
-
Bootnode: A bootstrap node that enables other nodes to discover each other
-
Three Fiber nodes: each with an independent key and wallet, capable of opening channels and transferring funds to each other
-
Fund Distribution Tool: Automatically transfers test CKB and sUDT to each node
In short, everything that should be there is present, and all are pre-configured.
Demo Application
This is where I’ve put a lot of thought into. I’ve developed a Next.js web application with two modes:
Quick Start: Three Steps, Hands-On Guidance for You
The Quick Start Mode is specifically designed for new users, breaking down the core operations of Fiber Network into three steps:
Step 1: P2P Connection

Everything starts with connection. On the left side of the interface is the step navigation, in the middle is a topology diagram showing two nodes, Alice and Bob, and on the right is the corresponding TypeScript code example.
Click the “Execute” button, and Alice will connect to Bob’s P2P network. The interface will display in real-time:
-
The connecting line changes from a dashed line to a solid blue line
-
Expand the RPC call record, and you can see
the parameters and return values of the connect_peermethod -
The code in the code panel can be copied with one click
Step 2: Establish a payment channel

P2P connection is only the first step; to transfer funds, a channel must first be opened. This step will call the open_channel method, where Alice opens a payment channel of 100 CKB to Bob. The interface will display an animated state indicating that the channel is being established, and the underlying layer needs to wait for on-chain confirmation.
Step 3: Off-chain Payment

The channel is set up, and finally we can transfer funds! This step simulates a real payment process: a payment animation will be displayed on the interface - a small light dot flying along the channel connection from Alice to Bob.
By completing these three steps, you have already experienced the core process of Fiber Network!
Full Demo: Welcome to Your Fiber Control Panel
Imagine this: in front of you lies a dynamic digital canvas, on which a micro-payment network quietly unfolds - this is not an abstract concept map, but a real, operational Fiber Network test environment. You can click, drag, and even watch as funds flow between nodes like light. This is the Full Demonstration Mode: your experimental sandbox and the best window to understand how Fiber works.

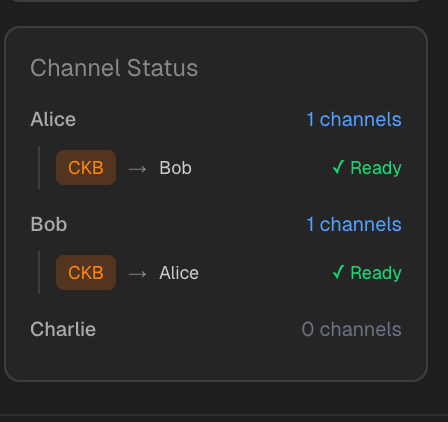
Get a clear view of the entire network at a glance
At the center of the canvas lies the “foundation” of the entire system—the CKB Layer 1 node. It sits firmly at the top, displaying the current block height and node version, silently providing security for the upper layers. Beneath it, three roles are in place:
-
Alice is in the upper left corner and is an ordinary user (user), just like you and me;
-
Bob is located in the upper right corner, with the role of a Routing Node (router), responsible for forwarding payments;
-
Charlie sits at the bottom center and is a merchant, always ready to receive payments.
They are not yet connected, but with just one click, a channel can be established and funds can flow.
Left Sidebar: Your Operational Hub
This is the core of your interaction with Fiber. Depending on the selected node, the panel content will adjust intelligently, but the core functions always revolve around three things: creating channels, closing channels, and sending payments.
Establishing a Channel: The First Step from On-chain to Off-chain
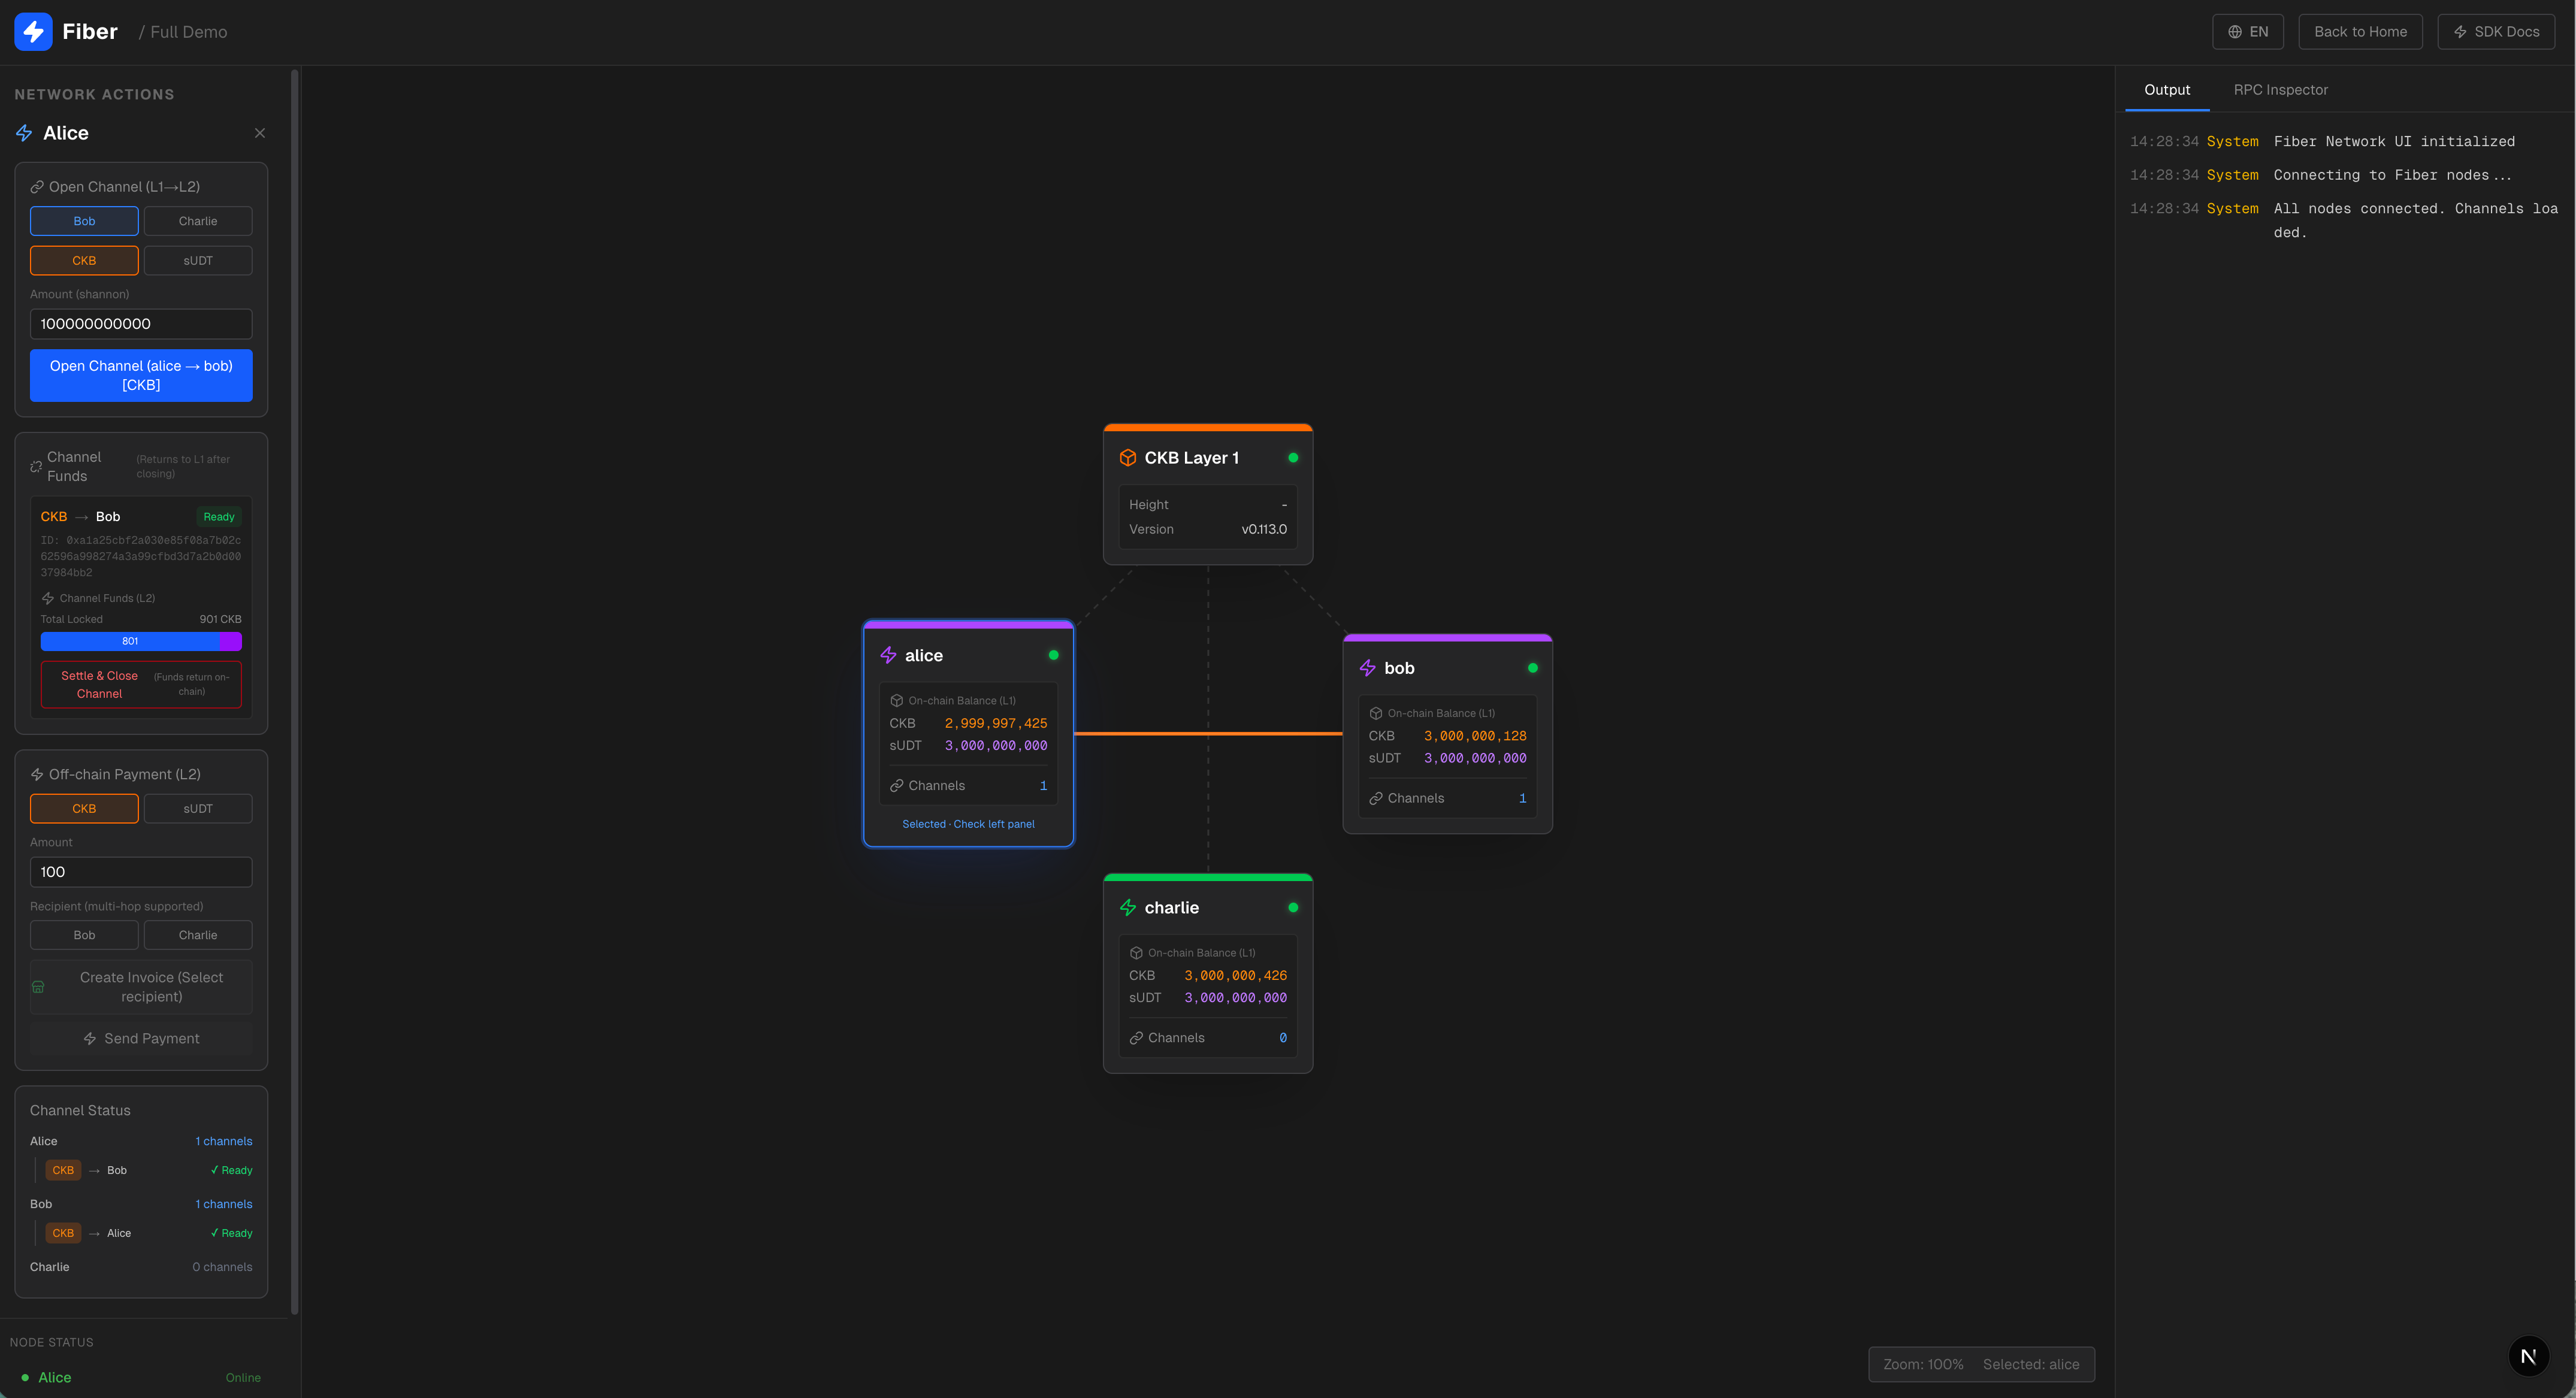
Want to start a transaction between Alice and Bob? Simply select Bob as the target in the “Create Channel” area, then choose an asset - it can be native CKB (default 100 CKB) or sUDT. After clicking “Confirm”, the prompt “Confirming…” will immediately appear on the interface.
At this point, a dotted line begins to flicker and jump between Alice and Bob, indicating that the channel is waiting for on-chain confirmation. After approximately 10 to 20 seconds, the dotted line solidifies into a connection, and the channel status changes to green “Ready”—now, they can transfer funds off-chain at high speed and low cost.
Initiate Payment: Let Value Flow Like Light
This is the most exciting part.
Payment is divided into two steps to simulate a real scenario:
-
Invoice Generation: Select the asset type in the panel, enter the amount, and click “Generate Invoice”. The system immediately calls
new_invoice, spitting out a string of invoice characters in the form offibd1qp.... -
Payment: Click “Pay” to initiate off-chain payment
What if there is no direct connection between Alice and Charlie? No problem. As long as they are both connected to Bob, the light spot will first fly to Bob and then turn towards Charlie. This is multi-hop routing: Fiber automatically finds the optimal path for you, without pre-setting and without trusting intermediaries.
After successful payment, the balances of all relevant channels are updated in real time, and the detailed records are synchronously refreshed in the log panel on the right.
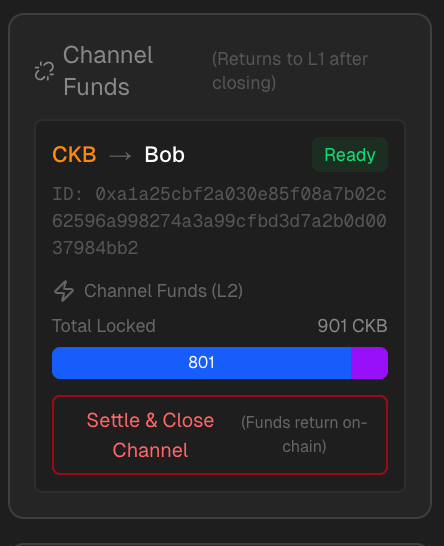
Close Channel: Safe Exit, Funds Returned
When a channel is no longer needed, you can close it at any time. Each channel is presented in the form of a card:
-
The label clearly indicates whether it is CKB or UDT;
-
Displays who the other party is (e.g., “→ Bob”);
-
Use colors to distinguish states: green indicates available, yellow indicates still being confirmed;
-
At the bottom, there is also a delicate balance distribution bar: blue represents the portion you own, and purple represents the counterparty’s.
Only “Ready” channels can be closed. Once the close button is clicked, the funds within the channel will be settled back onto the CKB chain, and you can even see the on-chain balance on the node card increase accordingly - the closed loop is completed, ensuring peace of mind.
Channel Status Area: Global view, at a glance
At the bottom of the sidebar, there is a “Channel Overview” area. Each node occupies a row, showing how many channels it currently has. When expanded, you can see the asset type, counterparty, and status of each channel. Even channels in confirmation are accompanied by a small spinning icon - quiet yet informative.
Right Panel: Dual Perspectives, All-Encompassing Insights
The right side uses a double-tab design to meet the needs of different stages.
Output Label: Real-time Logs, Always by Your Side
Here resembles a terminal window, scrolling the heartbeat of the system:
Text
Edit
14:32:15  Request  alice     open_channel { to: 'bob', amount: '100000000000' }
14:32:35  System   channel_ready  alice → bob 通道已就绪
14:32:45  Request  alice     send_payment { invoice: 'fibd1qp...' }
14:32:46  Response alice     send_payment { status: 'Success' }
Different colors identify different types of messages: yellow for system notifications, blue for requests, green for responses, and red for errors. The log automatically scrolls to the bottom, keeping you always focused on the latest updates.
RPC Inspector Tab: The Developer’s “Living Document”
If you are a developer, this tab will be more useful. Every operation will leave a complete RPC call record here.
Click on any historical record, and you will see:
-
Method name and time taken (e.g.,
open_channel · 156ms) ; -
Clear description: “This method is used to open the payment channel…”;
-
Parameter table, explaining the purpose of each field;
-
Actual JSON parameters passed in;
-
and the return result.
When it fails, it also highlights error messages. No need to refer to documentation or guess parameters—what you see is what you use. This is the “living API documentation”.
This control panel is not just a demonstration tool. It is a window into the world of Fiber: through it, you can personally build channels, initiate cross-node payments, observe the flow of funds, and even debug the underlying RPC. Whether you are a curious user, an exploring developer, or a researcher studying Layer 2 architecture, there is a place for you here.
Now, it’s your turn - click on Alice and try that 50 CKB payment. The light dot is waiting for you.
Fiber JS SDK: Hide complexity behind, deliver simplicity to you
The Fiber node itself exposes a standard JSON - RPC interface—technically, you only need to use fetch to send a request to talk to it. But reality is often not that ideal.
Imagine this: you want to open a payment channel, but you have to manually convert the amount to hexadecimal and append the 0x prefix; if you want to use UDT, you still have to dig out the code_hash and args you noted down last time and carefully fill them into the type_script; when the call fails, the returned error message is as hard to understand as a mystery… These trivial “frictions” gradually erode the development experience bit by bit.
So, this project did one thing: encapsulate all the repetitive, error-prone, and inefficient parts into a lightweight and intelligent Fiber JS SDK.
One piece of code, two worlds
Let’s take a look at a comparison.
Without SDK (raw RPC):
const res = await fetch("http://127.0.0.1:10001", {
  method: "POST",
  headers: { "Content-Type": "application/json" },
  body: JSON.stringify({
    jsonrpc: "2.0",
    method: "open_channel",
    params: [{
      peer_id: peerId,
      // ⚠️ It must be a hexadecimal string; you cannot pass a number directly.
      funding_amount: "0x" + BigInt(amount).toString(16),
      // ⚠️ UDT channel? You'll need to construct the complete type script yourself.
      funding_udt_type_script: {
        code_hash: "0xe1e3...",
        hash_type: "data",
        args: "0xc219..."
      }
    }],
    id: Date.now()
  })
});
Just the warnings in the comments are enough to make one’s hair stand on end.
After using the SDK:
import { openChannel } from "@/lib/fiber-client";
const result = await openChannel("alice", {
  peerId: "QmXb...",
  fundingAmount: "10000000000",   // ✅ Pass a numeric string directly.
  assetType: "UDT"                // ✅ Automatically inject the correct UDT type script.
});
Does it seem like a different language? The parameters have become “human-friendly”, with clear logic and intentions that are immediately obvious.
What exactly does the SDK take on for you?
-
Automatic Format Conversion
For all fields related to on-chain format, the SDK silently takes care of them for you: -
The amount (in shannon) is automatically converted from decimal to hexadecimal with
0xprefix; -
The expiry time (expiry) is automatically converted from seconds to a hexadecimal string;
-
No longer need to manually splice, no longer worry about format errors.
-
Smart encapsulation of asset types
UDT’stype script? No need to copy and paste every time. The SDK comes with built-in configurations for common assets (such as Fibd, Fiber), you just need to specifyassetType: "UDT", and it will know whichcode_hashandargsto use. Even thecurrencyfield will be automatically populated based on the current network environment. -
Error handling is more user-friendly
Whether it is a 500 error at the HTTP layer or-32602returned by JSON-RPC, the SDK will uniformly throw a JavaScript exception with a clear description. You can use the familiartry/catchto catch it, significantly improving debugging efficiency. -
Observability Out Of The Box
Each method provides aWithTraceversion (e.g.,openChannelWithTrace), which automatically records complete requests, responses, and elapsed time, and pushes the data to the RPC Inspector panel in the demo application. During development, you can not only know “whether it succeeded”, but also immediately see “why it succeeded” or “where the problem occurred”.
What capabilities does it cover?
The SDK currently focuses on the most core interaction scenarios of Fiber, including:
-
Node Connection (
connectPeer) -
Channel Management (
openChannel,closeChannel,listChannels) -
Payment operations (
sendPayment,newInvoice,lookupInvoice) -
Network Query (
getInfo,listPeers)
Each method comes with complete TypeScript type definitions, and when used with modern IDEs, it provides automatic completion, parameter hints, and error checking out of the box - writing code
Exclusive Document Page: Not Just a Reference, but a Guide

On the top navigation bar of the demo application, click “SDK Docs”, and you will enter a documentation space specifically designed for developers.
The homepage uses a comparison table to tell you: “Why do you need this SDK?” - on the left is the cumbersome writing of the original RPC, and on the right is the concise call of the SDK, with the differences clearly visible at a glance. It also comes with a quick reference guide for common pitfalls in Raw RPC, such as:
-
All amounts must be hexadecimal strings;
-
new_invoicemust explicitly specifycurrency; -
list_channels’s parameter is[{}], not an empty array[]; -
Before opening a channel, be sure to call
connect_peer…
Enter the details page of any method, and you can see:
-
Clear TypeScript function signature;
-
Parameter description table (field name, type, required or not, purpose);
-
Detailed Explanation of Return Value Structure;
-
Two-column code example: SDK on the left, original RPC on the right, with one-click switching available;
-
The “Precautions” section provides early warnings about those details that can only be understood after experiencing pitfalls.
This document page is completely independent, and you can refer to it as an API manual for daily development at any time, even if you are not in the demonstration environment.
The goal of the Fiber JS SDK is simple: to allow developers to focus on business logic rather than the minutiae of underlying protocols. It doesn’t show off skills or pile on features; it only does one thing—handle those details that shouldn’t concern you.
Now, you can open a channel with a single line of code, complete cross-node payments with a single function call, and quickly locate issues with clear error messages. And all the complexity behind this is quietly shielded from your view by the SDK.
After all, a good tool should make you unaware of its existence - only feel the efficiency.
Some details
Regarding the construction time
When running docker compose up --build for the first time, it is necessary to compile CKB and Fiber from source code, which will take relatively longer. However, it only needs to be done once, and subsequent runs will be faster.
About Language
The demo application supports switching between Chinese and English to accommodate friends from different backgrounds.
Who is suitable for using this?
I think these types of friends will be interested:
-
People who want to learn Fiber Network: No need to struggle with the environment; just follow the three-step process to understand the core concepts
-
People who want to demonstrate Fiber features: The visual control panel is very intuitive to display
-
Those who want to develop Fiber applications: The SDK enables you to quickly get started, the documentation page is available for reference at any time, and the local environment can be tested at any time
-
People who want to experience CKB payment channels: Feel the off-chain payment in the style of Lightning Network
Finally
The problem this project solves is rather minor, which is simply to save you the time of setting up the environment. However, I believe that lowering the entry barrier is crucial for technology promotion.
If you are interested in Fiber Network, feel free to give it a try. If you have any questions, you are welcome to submit an issue or contact me for communication.
Hope it helps you!